Basketball Court Installation | Process, Costs & Hiring an Installer

Basketball court installation involves preparing the site, building or checking the foundation, fitting the playing surface, and installing the basketball equipment.

The work depends on whether you’re building a new outdoor court, resurfacing an existing one, or installing an indoor sports floor.

This guide explains the installation process, what affects the price and timeline, and what to check when hiring a basketball court installer.

What Does Basketball Court Installation Involve?

Basketball court installation generally covers three types of projects:

  • New court construction: Building a court from bare ground, including excavation, drainage, foundation, playing surface, and equipment.
  • Court resurfacing: Preparing and repairing a suitable existing surface before applying a new sports coating or flooring system.
  • Surface installation: Fitting modular tiles or another playing surface over a foundation that meets the manufacturer’s requirements.

A quote for installing basketball court tiles may not include constructing the concrete base underneath them.

Before hiring a contractor, confirm exactly which work is included.

Types of Basketball Court Installation

Outdoor Basketball Court Installation

Outdoor basketball courts need foundations and surfaces suitable for weather exposure, ground conditions, and drainage.

Concrete and asphalt are common outdoor bases. Depending on the system, the finished surface may use acrylic coatings or interlocking sports tiles.

The installer must check the site’s soil conditions, drainage, and the chosen surface manufacturer’s specifications.

Indoor Basketball Court Installation

Indoor basketball courts often use maple hardwood or synthetic sports flooring.

Hardwood installation requires a suitable subfloor, moisture testing, controlled temperature and humidity, and space for wood movement.

Synthetic flooring systems have different requirements for adhesives, underlayments, moisture control, and performance testing.

A professional-grade basketball court may need flooring that meets specific requirements for shock absorption, ball rebound, and slip resistance. The installer should confirm which performance standards apply to the facility and its intended level of play.

Backyard and Driveway Basketball Courts

Residential basketball court installation may involve a shooting area, half court, or larger playing space.

An existing driveway can sometimes serve as the base for an approved court surface.

However, cracks, ground movement, excessive slopes, drainage problems, and nearby obstacles can make a driveway unsuitable.

For help choosing a home layout, read our backyard basketball court guide. Our basketball court dimensions guide also explains common court measurements.

Basketball Court Installation Process

A complete new-court installation generally follows these five stages. Surface-only projects may need fewer steps.

Step 1: Site Assessment and Court Design

The contractor checks the available space, ground conditions, access routes, nearby structures, and intended court use.

The design should identify:

  • Court dimensions and orientation.
  • Foundation and playing surface.
  • Hoop positions and overhang.
  • Drainage and surface levels.
  • Fencing, lighting, and other equipment.

The owner and installer should also establish who handles planning approvals, permits, and underground utility checks before excavation begins.

Step 2: Groundwork, Drainage and Base Preparation

For a new outdoor court, workers remove unsuitable material, prepare the subgrade, and construct the specified foundation.

This may include excavation, aggregate layers, compaction, drainage, and concrete or asphalt installation.
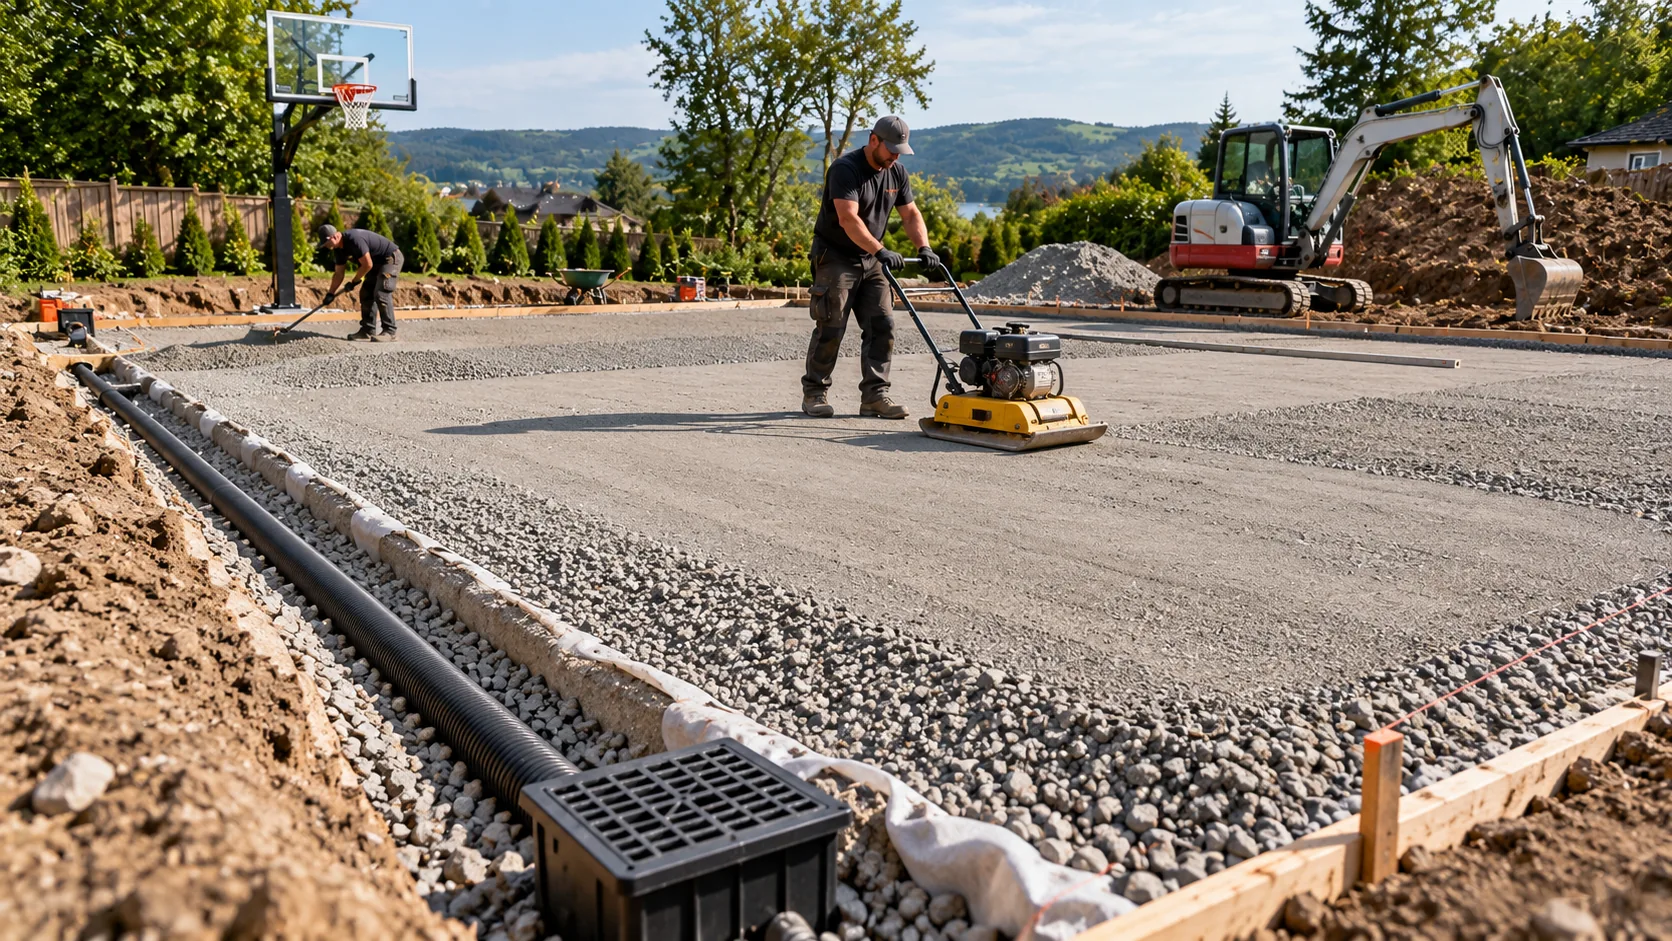
Ground preparation and drainage installation before construction of an outdoor basketball court.

Drainage needs more than a sloped playing surface. The project must also provide a suitable destination for runoff without creating problems for buildings or neighbouring properties.

The durability of a basketball court depends heavily on its foundation and drainage. There is no universal slab thickness or drainage slope suitable for every project. The correct specifications depend on site conditions, engineering requirements, and the selected surface system.

For additional technical resources, consult the American Sports Builders Association’s construction guidance.

Step 3: Installing the Court Surface

The installer checks that the foundation meets the requirements of the playing surface before work begins.

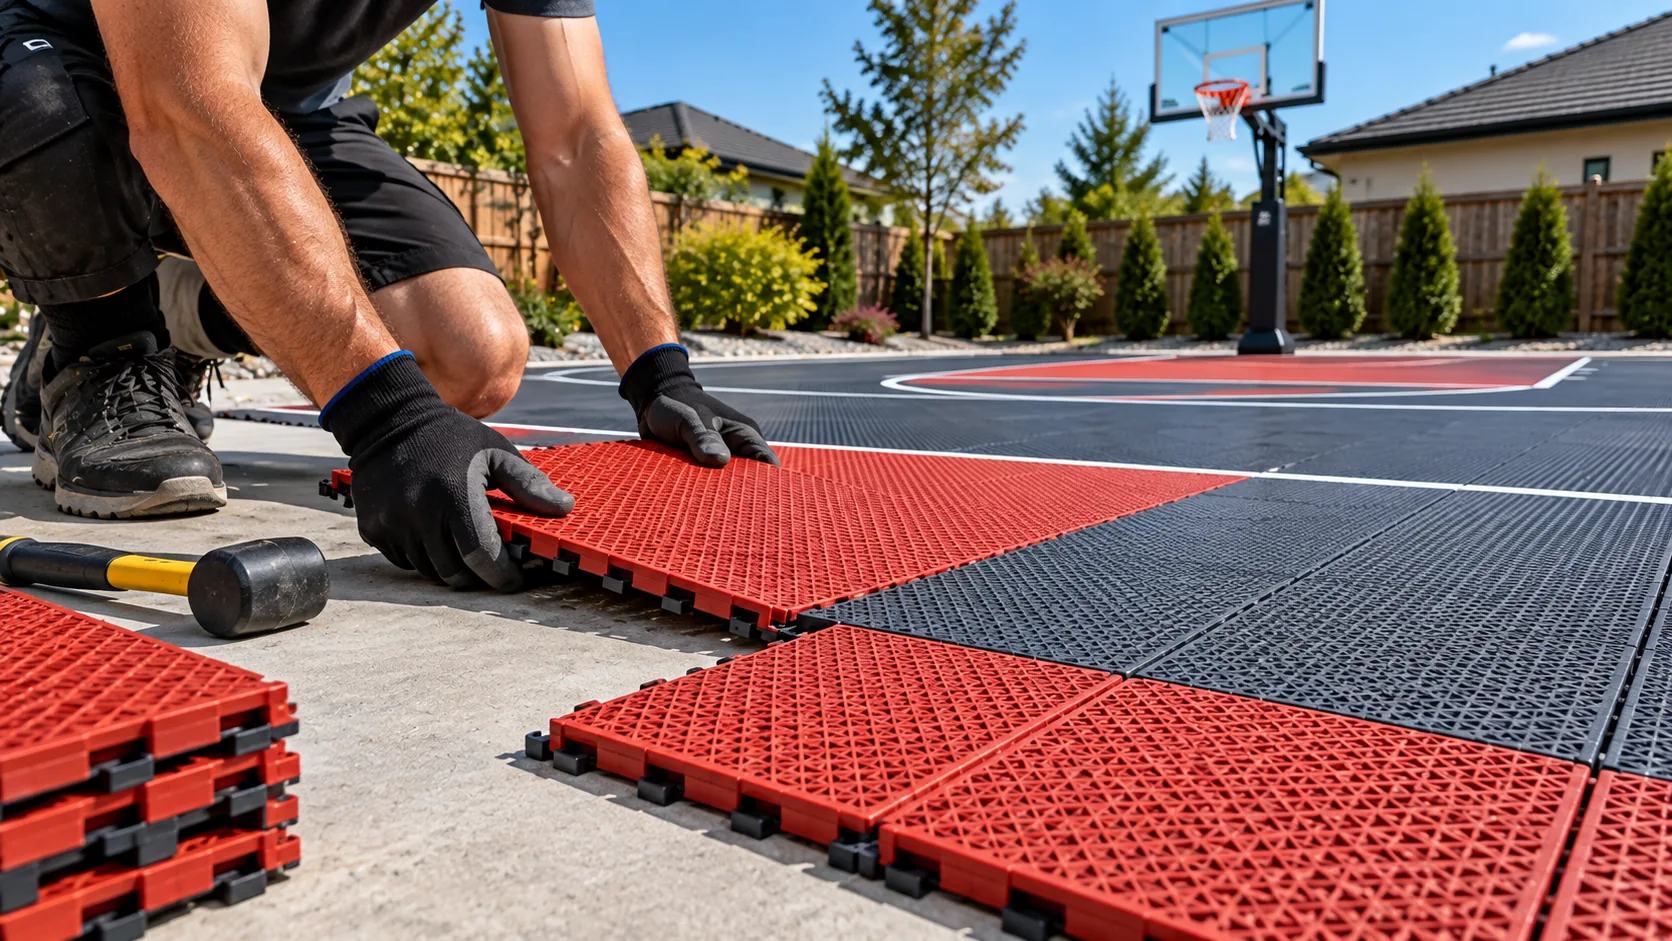
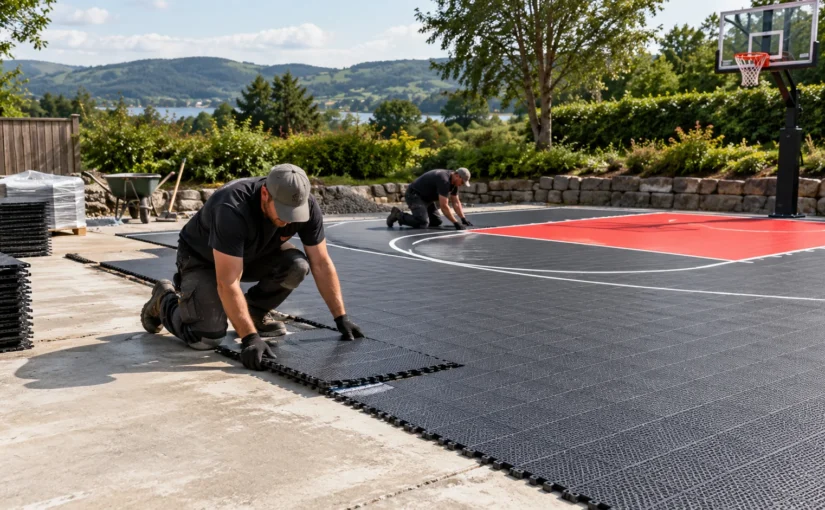
Modular basketball court tiles are laid according to the manufacturer’s instructions for alignment, expansion clearance, edges, and connections.

VersaCourt’s tile installation instructions explain how to position interlocking panels, allow for expansion, and fit court edges.

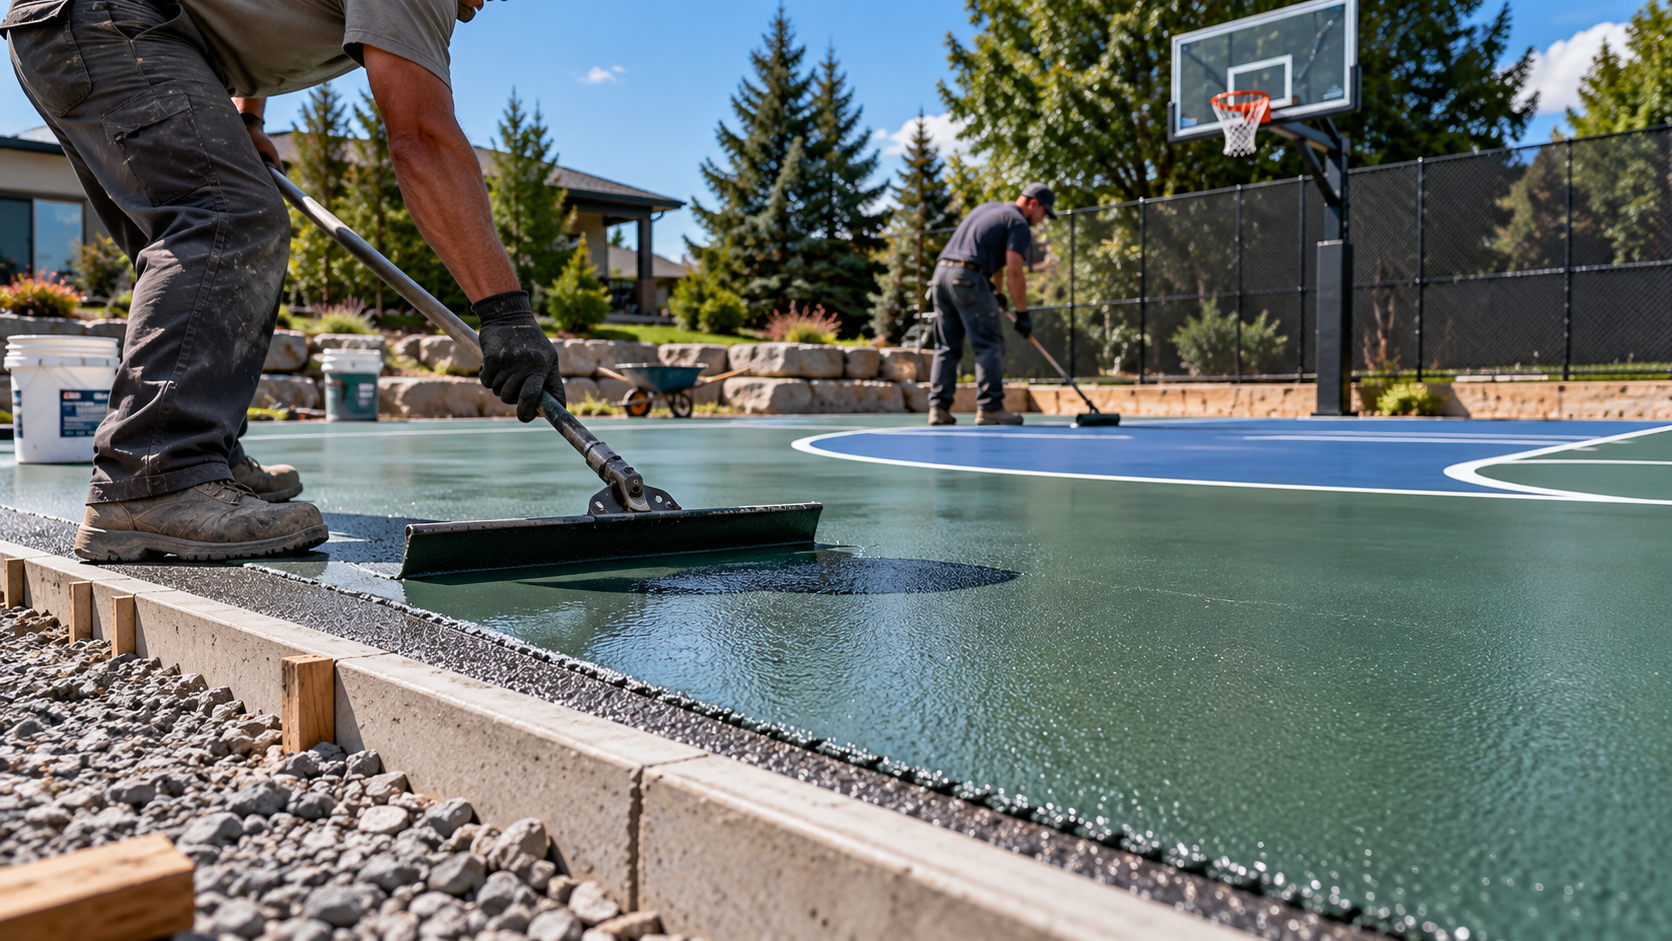
Acrylic sports coatings require a properly cured, clean, sound base. Installers prepare the surface and apply the specified coating layers.

SportMaster’s acrylic resurfacer instructions explain the surface cleaning, repairs, and application conditions required for its coating system.
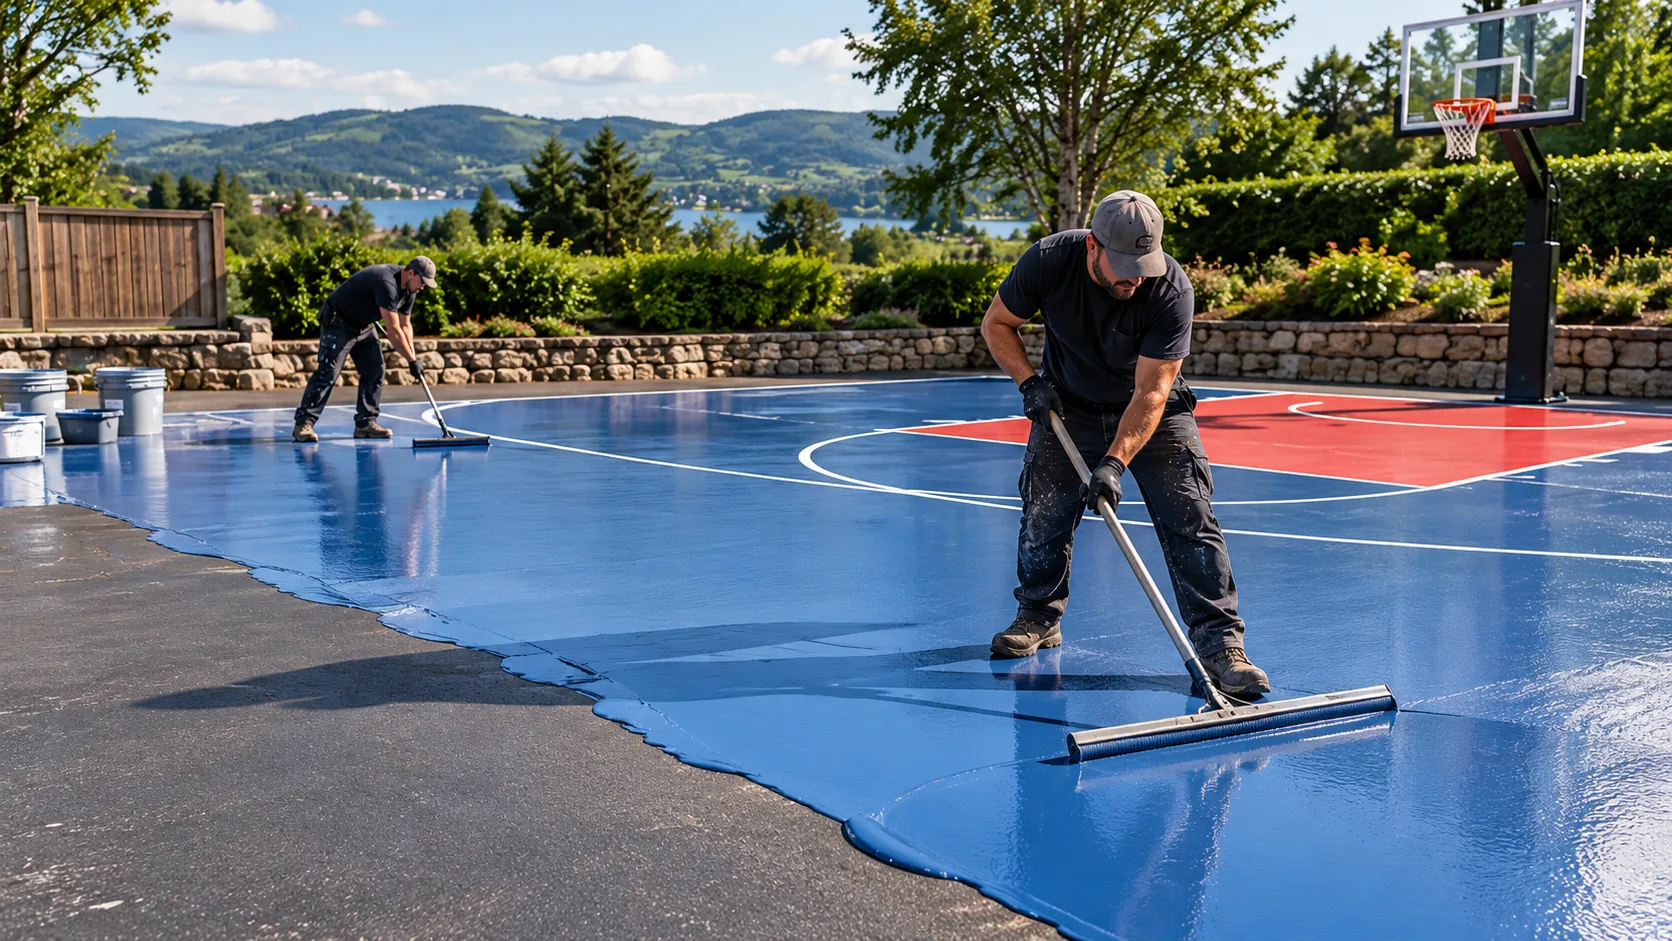
Contractors applying blue acrylic sports coating to an outdoor basketball court using squeegees
Contractors applying an acrylic sports coating to an outdoor basketball court.

Indoor hardwood and synthetic flooring require specialist installation methods, particularly where moisture control and sports performance standards apply.

Surface installation should not begin until significant foundation defects have been addressed.

Step 4: Hoop Installation and Court Markings

Basketball hoop systems need suitable foundations or anchor points, correct positioning, and secure assembly. In-ground, wall-mounted, and ceiling-mounted systems have different structural requirements, so the installer must follow the instructions for the specific model.

In-ground basketball hoop installation must follow the specific model’s instructions. Footing dimensions and curing requirements vary.

Goalrilla’s basketball hoop product manuals provide model-specific assembly and installation instructions.

Court markings should match the approved layout. Competition courts must follow the chosen governing body’s rules, while recreational courts may use custom markings.

See our basketball court diagram guide for an explanation of common lines and markings.

Step 5: Final Inspection and Handover

The installer should check the court before handing it over.

Player safety should be part of the final inspection. Check for trip hazards, sharp edges, loose hoop components, and uneven transitions between the court and surrounding ground.

The inspection should cover surface defects, drainage, edges, markings, hoop stability, and any unfinished work.

Ask for the approved layout, product information, maintenance instructions, relevant warranties, and a confirmed safe-to-play date.

Record outstanding defects in writing before accepting the completed project.

How Long Does Basketball Court Installation Take?

Installation time depends on the project scope, site preparation, materials, and weather.

Modular tiles may take one to several installation days once a suitable base and the required materials are ready.

Building a court from bare ground can take weeks or longer when excavation, approvals, foundation work, deliveries, and curing periods are included.

New concrete may need around 28 days of curing before certain acrylic coatings can be applied. That does not mean every basketball court system has the same waiting period.

Ask for a project schedule that separates active installation time, waiting periods, and the date the court can be used.

How Much Does Basketball Court Installation Cost?

Basketball court installation costs vary according to the work required.

Major cost factors include:

  • Court size and location.
  • Excavation and soil conditions.
  • Foundation construction or repairs.
  • Surface materials and installation methods.
  • Drainage and access restrictions.
  • Labour and specialist equipment.
  • Basketball hoops, fencing, and lighting.
  • Permits, inspections, and site restoration.

Installing a surface over suitable existing pavement may avoid some new foundation work, but repairs and drainage improvements can still be expensive.

Set a realistic budget that includes site preparation, installation, equipment, and a contingency for unexpected work. When comparing contractor quotes, check that they cover the same specifications and clearly identify any exclusions.

For detailed construction cost information, see our basketball court construction cost guide.

How to Choose a Basketball Court Installer

Look for an installer with experience building courts similar to yours.

Ask for completed project examples, preferably including older courts where drainage and surface wear can be assessed.

Check applicable licences or registrations, insurance, references, and experience with the proposed surface.

If you’re choosing a branded modular or specialist flooring system, confirm whether the manufacturer requires an authorised installer for warranty coverage.

Obtain a written quote identifying the foundation, drainage, surface materials, equipment, and responsibilities of any subcontractors.

Questions to Ask Before Installation

Before signing a contract, ask:

  1. Does the quote cover the entire court or only the playing surface?
  2. Who handles permits, utility checks, and inspections?
  3. What foundation and surface products will be installed?
  4. How will drainage work, and where will runoff go?
  5. What happens if unsuitable ground or existing pavement is discovered?
  6. How long will each installation stage take?
  7. When can the finished court be used?
  8. Which warranties cover the foundation, surface, workmanship, and hoop?
  9. Who handles defects discovered during the final inspection?

Get the agreed scope, materials, schedule, payment stages, and exclusions in writing.

Common Basketball Court Installation Problems

Several problems can appear when preparation or installation requirements are missed.

Standing water: Low spots, unsuitable grading, or inadequate drainage may leave puddles on the surface.

Cracking and settlement: Weak ground, unsuitable foundations, or movement can damage the playing area.

Buckling modular tiles: Incorrect expansion clearance or restraint can interfere with normal temperature-related movement.

Peeling acrylic coatings: Moisture, contamination, inadequate preparation, or unsuitable curing conditions can affect adhesion.

Unsafe court edges: Poor transitions, raised tiles, or missing edge treatments may create trip hazards.

Loose basketball hoops: Incorrect footings, anchors, or assembly can affect equipment stability.

The contractor should explain how the proposed installation addresses these risks.

DIY vs Professional Basketball Court Installation

Some modular court systems allow homeowner installation over a suitable, approved foundation.

However, excavation, drainage, foundation construction, specialist coatings, indoor sports flooring, and structural hoop installation may require professional skills and equipment.

Consider the tools needed, safety risks, installation tolerances, warranty requirements, and the cost of correcting mistakes.

Our DIY basketball court guide covers the broader building process for homeowners.

Basketball Court Installation FAQs

Do You Need a Permit for a Backyard Basketball Court?

Possibly. Planning and permit requirements depend on your location, court size, groundworks, drainage, fencing, and lighting.

Check with the relevant local authority before construction. Confirm whether you or the contractor is responsible for applications.

Can You Install Basketball Court Tiles Over Concrete?

Yes, many modular tile systems can be installed over suitable concrete.

The base must meet the selected manufacturer’s requirements for stability, drainage, flatness, and preparation.

Tiles cannot repair serious settlement or foundation failure.

Can You Install a Basketball Court Year-Round?

Some indoor installations and modular surface projects can proceed in cooler weather if the required conditions are met.

Outdoor concrete work, excavation, and acrylic coatings can be delayed by freezing temperatures, rain, or unsuitable surface conditions.

Follow the relevant material and equipment manufacturer’s instructions.

Final Thoughts

Before approving a basketball court installation, confirm the project scope, foundation requirements, drainage plan, surface specification, and contractor responsibilities.

The finished court should match the approved design, pass the agreed inspections, and include clear maintenance and warranty information.

Do not accept the court until the installer confirms when it is safe to use.
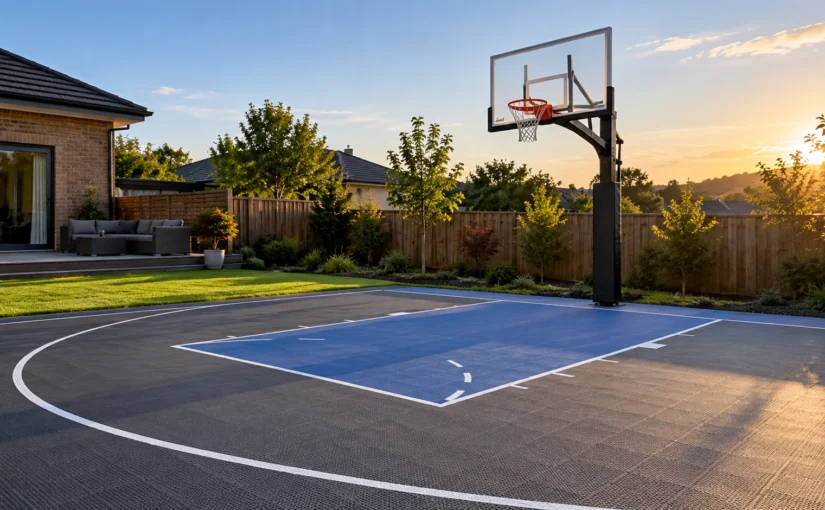
Backyard Basketball Court | Sizes, Surfaces & Design Ideas

A backyard basketball court gives you a convenient place to practise shooting, improve your ball handling, or play games with family and friends. You don’t need a full-size court to enjoy basketball at home. Even a small shooting area can work well if you plan the space properly.

The right backyard basketball court depends on your available space, budget, playing needs, and preferred surface. Before choosing materials or buying a hoop, consider how you’ll use the court and what your property can realistically accommodate.

Backyard Basketball Court Options and Sizes

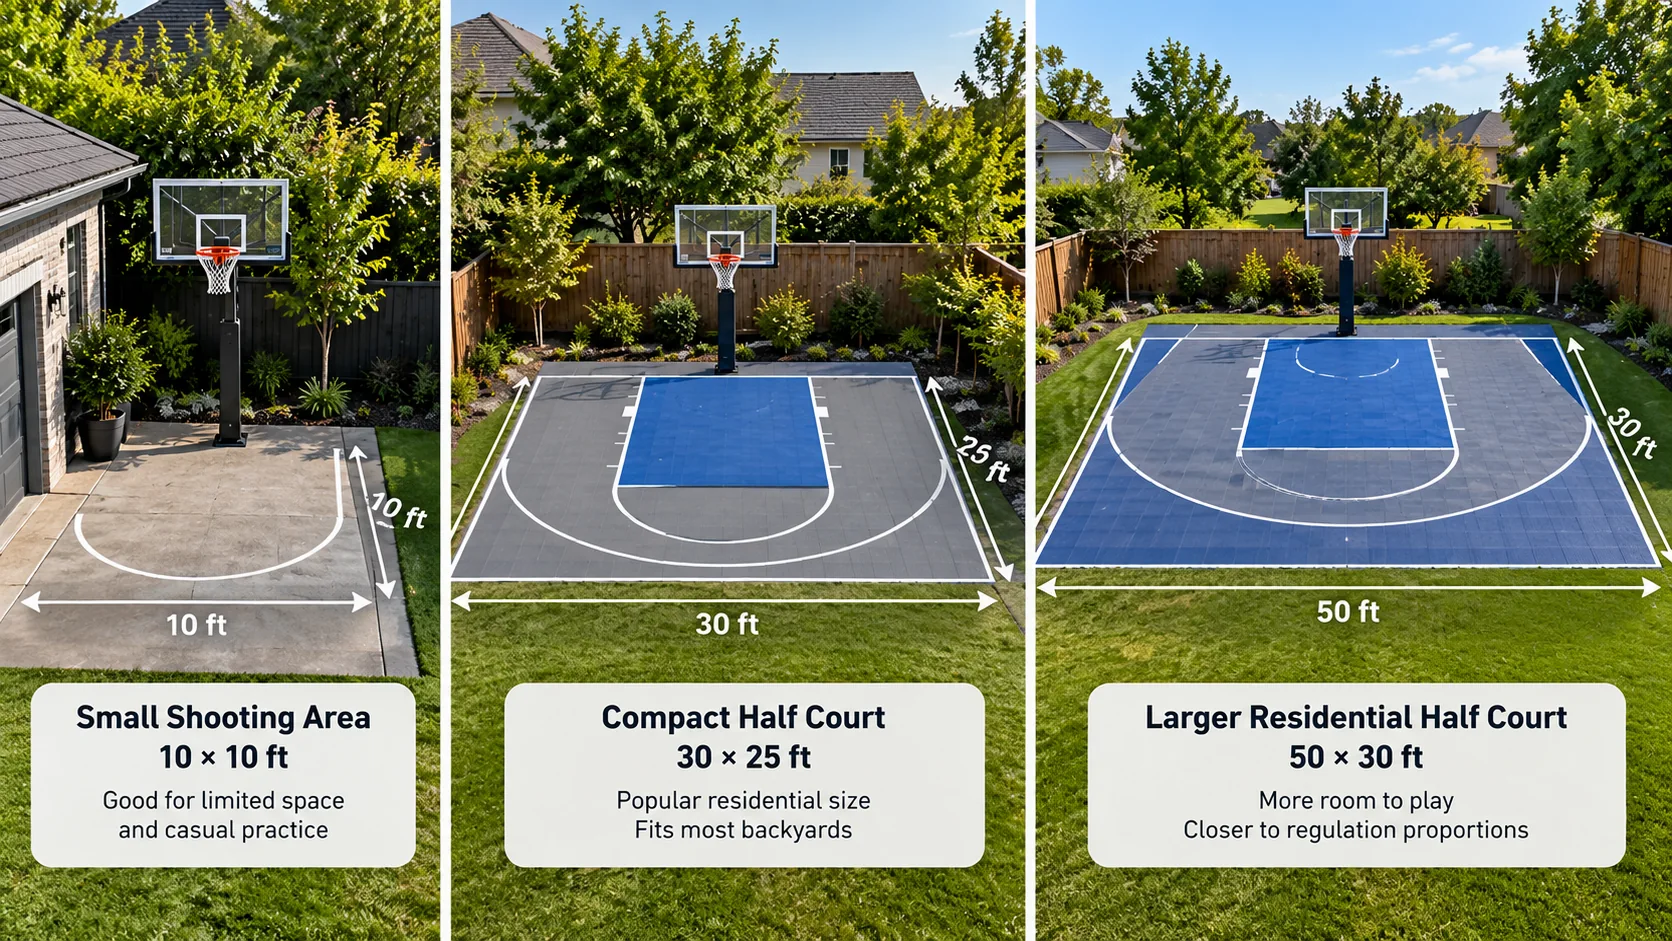
Backyard basketball courts come in different sizes and layouts. Some homeowners only need enough space to practise shooting, while others want a half court for one-on-one or three-on-three games.

Comparison of three backyard basketball court layouts: a small shooting area, compact half court, and larger residential half court
Examples of backyard basketball court layouts for different space requirements, from a small shooting area to a larger residential half court.
Court type Best for Main consideration
Shooting area Individual practice and small backyards Limited movement and shooting distance
Driveway court Homes with an existing paved driveway Vehicles, slopes, and nearby obstacles
Compact court Shooting drills and casual games May not fit regulation markings
Residential half court Families and small-sided games Needs enough width and clear space
Full court Large properties and team games Requires substantial space and clearance

Small Shooting Areas and Driveway Courts

A small shooting area is often the easiest way to play basketball at home. It might consist of a single hoop and a hard surface large enough for close-range shots, free throws, and basic dribbling.

A driveway can also serve as a basketball area if its surface is suitable. Before installing a hoop, check for steep slopes, cracks, parked vehicles, garage doors, and nearby roads.

If you plan to add modular basketball court tiles, confirm that the existing pavement meets the manufacturer’s installation requirements. Not every tile system is suitable for vehicle traffic.

Compact Backyard Basketball Courts

A compact basketball court provides more room than a basic shooting pad without requiring a regulation half court.

You can include a free-throw line, part of the key, and selected shooting spots. A full three-point line may not fit, particularly when the available space is narrow.

Focus on the basketball activities you enjoy most. If you mainly practise layups and mid-range shots, a wider playing area may be more useful than a long, narrow court.

Backyard Half Courts

A backyard half court is a popular choice for families and players who want enough space for shooting, rebounding, and small-sided games.

There is no single official size for a residential half court. Commercial court packages are available in different dimensions, including approximately 30 × 30 feet and 50 × 30 feet.

For example, a 30 × 30-foot court can support shooting and casual games, while a 30 × 40-foot layout offers more room for movement. These are examples of custom backyard dimensions, not official half-court standards.

For comparison, half of an NBA-sized 94 × 50-foot playing rectangle measures 47 × 50 feet. That measurement does not include additional space for safe movement, hoop supports, or other obstacles.

The best size depends on the shots, drills, and games you want to play, plus the clearance available around the court.

Full-Size Basketball Courts

A full basketball court has two hoops and enough space for end-to-end play.

Official playing-court dimensions include:

  • NBA: 94 × 50 feet.
  • NCAA men’s basketball: 94 × 50 feet.
  • FIBA: 28 × 15 metres.
  • NFHS high school: An ideal court size of 84 × 50 feet.

These dimensions describe the playing area, not the complete space required for a backyard installation.

A full court also needs room for equipment, access, drainage, and appropriate clearance around the playing area.

For a closer look at official measurements, see our guide to basketball court dimensions.

Backyard Basketball Court Design Ideas

A good backyard basketball court design should make the most of your available space while keeping the playing area practical and safe.

Small Backyard Layouts

For a small backyard, position one hoop at the end of a rectangular playing surface.

You may only need a free-throw reference, a few shooting spots, and enough room to approach the basket.

If balls could reach windows, neighbouring gardens, or roads, consider adding suitable containment netting behind the hoop.

Family Half-Court Layouts

A residential half court can include a key, free-throw line, and three-point arc where space permits.

An adjustable basketball hoop is particularly useful for families with children of different ages.

You can also use temporary shooting markers for younger players instead of permanently painting shorter distances onto the surface.

Full-Court and Multi-Sport Designs

If your backyard is large enough, a full court allows more realistic basketball games and conditioning drills.

Some homeowners also design their courts for other sports, such as volleyball or badminton.

For a multi-sport court, choose compatible flooring and removable equipment. Use different line colours so the basketball markings remain easy to follow.

Court Markings, Colours, and Accessories

Basketball court lines help players practise shooting distances and understand positioning.

A compact court doesn’t need every regulation marking. A clearly marked free-throw line and a few shooting references may be more useful than squeezing an entire court diagram into a small space.

Court colours can also improve the appearance of your backyard. Choose contrasting colours that make the lines easy to see.

Other practical design features include ball storage, fencing, lighting, and seating outside the playing area.

If you plan to play at night, outdoor LED court lighting can improve visibility. Position and angle the lights to illuminate the playing area without shining into neighbouring homes.

Pole padding can also help reduce injury risks where players might contact a hoop support, although it does not replace adequate clearance.

Our basketball court diagram guide explains the main lines and markings if you want to plan your layout.

Choosing the Best Location for an Outdoor Basketball Court

The best location for an outdoor basketball court is not necessarily the flattest-looking part of your backyard.

Start by measuring the available space and identifying obstacles such as trees, walls, fences, steps, and overhead cables.

Consider these factors before settling on a location:

  • Ground conditions: Soft soil, existing fill, or unstable ground may require additional preparation.
  • Drainage: Rainwater needs somewhere suitable to go without collecting on the court or affecting neighbouring property.
  • Sunlight: Check whether the sun will shine directly into your eyes during the hours you normally play.
  • Nearby obstacles: Keep the playing area away from windows, roads, exposed posts, and other hazards.
  • Access: Contractors and delivery vehicles may need room to transport materials and equipment.
  • Neighbours: Basketball noise, lighting, and balls crossing boundaries can cause problems.

Remember that the marked court is only part of the space you need. Hoop supports, fencing, surface edges, and safe movement around the playing area also require room.

There is no universal clearance measurement for every residential court. The appropriate space depends on the layout, equipment, and surrounding obstacles.

Best Backyard Basketball Court Surfaces

Your basketball court surface affects how the ball bounces, how the court feels underfoot, and how much maintenance it needs.

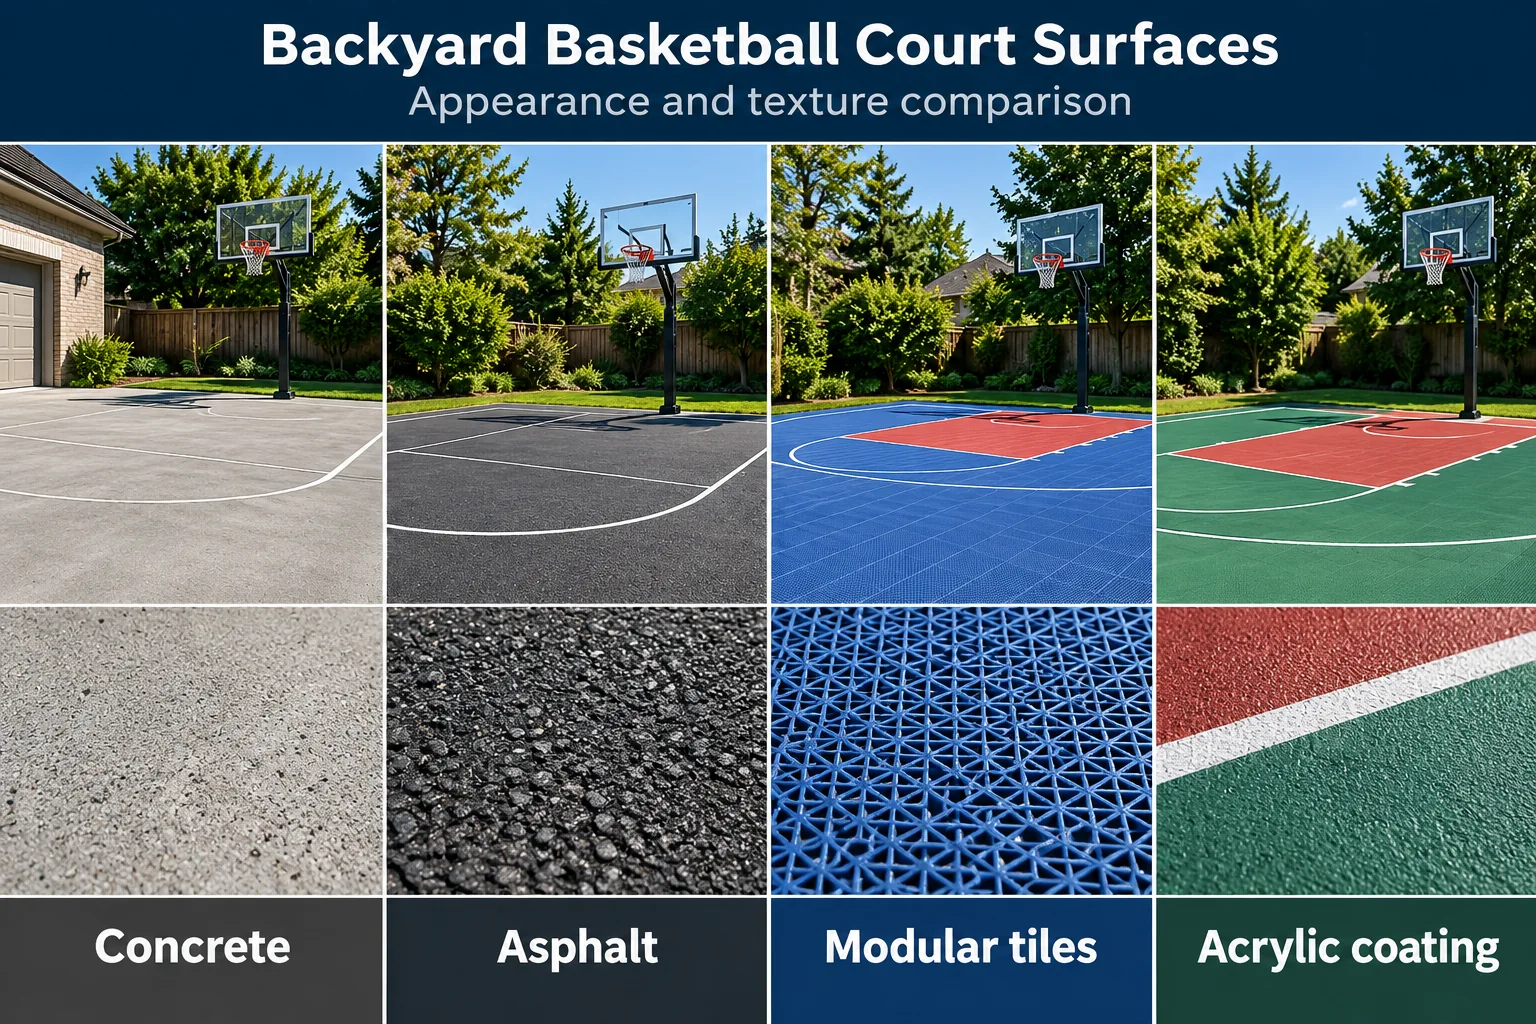
The main options include concrete, asphalt, acrylic coatings, and modular basketball court tiles.

For a step-by-step look at preparing the ground, installing the surface, and hiring a contractor, read our basketball court installation guide.

For further guidance on outdoor court planning, see FIBA’s outdoor basketball court recommendations.

Comparison of concrete, asphalt, modular tiles, and acrylic coating for backyard basketball courts, with surface texture close-ups
Visual comparison of four backyard basketball court surfaces: concrete, asphalt, modular tiles, and acrylic coating.
Surface Main advantages Main limitations
Engineered foundation panels Some systems offer alternatives to conventional paving Product-specific ground preparation and restrictions
Concrete Firm surface with predictable ball bounce Hard underfoot and may develop cracks
Asphalt Suitable for outdoor basketball and compatible coatings Can deteriorate with weather and ground movement
Modular tiles Replaceable sections and product-specific drainage features Need a suitable foundation and correct installation
Acrylic coating Coloured, textured playing finish Requires a properly prepared base and periodic maintenance

Concrete and Asphalt

Concrete is a common foundation for backyard basketball courts. A properly finished slab provides a firm playing surface with consistent ball bounce.

However, concrete is hard underfoot and may crack because of ground movement, drainage problems, or other conditions.

Asphalt is another outdoor basketball surface. It can be used on its own or covered with a compatible sports coating.

Both materials require appropriate ground preparation and drainage. Neither should be considered maintenance-free.

Modular Basketball Court Tiles

Modular basketball court tiles connect to create a finished playing surface.

Depending on the product, they may offer drainage openings, textured grip, different colours, and replaceable sections.

However, most modular tiles require a flat, stable foundation such as suitable concrete or asphalt.

Do not assume basketball court tiles can be installed directly on grass or dirt. Some manufacturers offer engineered alternative foundation systems, but these require their own approved preparation methods.

The ball bounce, traction, and impact characteristics also vary between tile products.

Acrylic Coatings and Alternative Foundations

Acrylic sports coatings provide a coloured, textured finish over properly prepared concrete or asphalt.

They can improve the appearance and playing texture of a court, but a standard acrylic coating does not repair structural cracks or automatically provide cushioning.

Some manufacturers also offer engineered foundation panels as alternatives to conventional concrete or asphalt bases.

These systems are not interchangeable with ordinary modular tiles. Check the complete manufacturer’s specifications before choosing one.

Choosing a Basketball Hoop for Your Backyard

The right basketball hoop depends on the available space, who will use it, and whether you want a permanent installation.

Portable basketball hoops are useful for driveways and temporary playing areas. They can be moved, but their bases occupy space and must be filled or weighted according to the manufacturer’s instructions.

In-ground basketball hoops are better suited to permanent courts. They generally provide greater stability, although they require an appropriate foundation and careful positioning.

Wall-mounted basketball hoops can save ground space when a suitable structural wall is available. Always check whether the wall and mounting system are approved for the intended installation.

Adjustable basketball hoops are useful for families. USA Basketball and the NBA recommend lower baskets for younger players where possible, including 8 feet for ages 7–8 and 9 feet for ages 9–11.

Before buying a hoop, check its adjustment range, support footprint, backboard overhang, and installation requirements.

Planning Your Backyard Basketball Court

Before building a backyard basketball court, confirm that the project is practical for your property.

Start with these decisions:

  1. Measure your space. Allow for the playing surface, hoop support, access, and surrounding obstacles.
  2. Choose the main purpose. Decide whether you want shooting practice, family games, or more competitive basketball.
  3. Check the location. Review drainage, ground conditions, sunlight, and access.
  4. Select a suitable surface. Make sure the foundation and playing surface are compatible.
  5. Choose your hoop. Confirm its dimensions and installation requirements before finalising the court layout.
  6. Check local requirements. Planning permission, building permits, property setbacks, drainage rules, and homeowners’ association restrictions vary by location.
  7. Plan the budget. Account for site preparation, surfacing, hoop installation, and optional accessories.

Some projects are suitable for DIY work, particularly when installing an approved modular surface over an existing sound foundation.

Larger projects involving excavation, concrete slabs, drainage, or structural hoop foundations may need professional assistance.

For detailed construction instructions, see our DIY basketball court guide. If you’re comparing project expenses, our guide to basketball court construction costs explains the main factors.

Backyard Basketball Court Maintenance and Common Mistakes

Regular maintenance helps keep a backyard basketball court usable and reduces the chance of small problems becoming larger repairs.

Sweep away leaves, dirt, and loose debris. Keep drains clear and check the surface for cracks, movement, or standing water.

Overhanging branches can drop leaves and other debris onto the court, so trim them where appropriate and safe. Clean the playing surface using methods approved by its manufacturer, and inspect cracks before they develop into larger problems.

Avoid sealing every crack without checking whether it indicates movement in the underlying foundation.

Inspect the basketball hoop for loose hardware, corrosion, damaged parts, and stability problems. Follow the manufacturer’s maintenance instructions for your specific equipment.

For modular surfaces, check for loose tiles, raised edges, and blocked drainage openings.

Common planning mistakes include:

  • Choosing a court size without allowing room for safe movement.
  • Ignoring drainage until construction begins.
  • Buying modular tiles before checking foundation requirements.
  • Positioning the hoop too close to obstacles.
  • Using unsuitable materials or coatings.
  • Overlooking neighbours, lighting, and noise.
  • Assuming every basketball court needs regulation markings.

A well-planned smaller court is often more useful than a larger court with poor positioning or limited clearance.

Backyard Basketball Court FAQs

How Small Can a Backyard Basketball Court Be?

There is no official minimum size for a residential basketball court. A small shooting pad can work if it provides enough room for the shots and movements you want to practise.

Is a 30 × 30-Foot Basketball Court Big Enough?

A 30 × 30-foot court can provide a useful one-basket area for shooting, free throws, and some casual games. However, it is not a regulation half court and cannot accommodate every official marking.

Can You Put a Basketball Court on Grass?

You can practise casual shooting on grass, but it doesn’t provide the consistent bounce needed for normal basketball dribbling. Most modular basketball court tiles also require an approved foundation rather than direct installation on grass.

Can Basketball Court Tiles Go Over a Driveway?

Yes, some modular basketball court tiles can be installed over suitable concrete or asphalt driveways. The pavement must meet the manufacturer’s requirements for condition, flatness, and drainage. Check separately whether the finished surface can handle vehicle traffic.

Do Backyard Basketball Courts Need Permits?

Sometimes. Requirements depend on your location and may involve groundworks, drainage, fencing, lighting, property boundaries, and other factors. Check with your local authority before starting construction.

How Can You Reduce Backyard Basketball Court Noise?

Position the hoop away from neighbouring homes where possible. Use appropriate containment netting to prevent balls from striking walls and fences, keep loose equipment, and avoid playing at disruptive hours.

Is a Half Court Enough for Basketball Practice?

Yes. A well-designed half court can support shooting, ball handling, layups, rebounding, and small-sided games. A full court is mainly necessary when you want end-to-end basketball.

Final Thoughts

A backyard basketball court doesn’t need to be full-size or expensive to be useful.

Start with the space you have and the type of basketball you want to play. Then choose a suitable layout, surface, and hoop while allowing for drainage, safe movement, and nearby obstacles.

Whether you create a small shooting area or a larger family half-court, thoughtful planning will make your backyard basketball court more enjoyable and practical for years to come.

DIY Basketball Court | How to Build Your Own Court

Building a DIY basketball court can be as simple as placing a hoop on an existing driveway. If you’re starting with grass or bare ground, you’ll need a stable foundation, proper drainage, and a suitable playing surface.

For most beginners, the easiest installation uses existing concrete or asphalt. You can add court lines, install modular sports tiles, or create a small shooting area without major construction.

This guide explains how to plan, build, and maintain your own basketball court, including which jobs are better left to professionals.

Can You Build a Basketball Court Yourself?

Yes. A DIY basketball court can range from a basic driveway setup to a permanent backyard basketball court.

The three main options are:

  • Existing pavement: Install a portable basketball hoop and mark shooting spots.
  • Modular sports tiles: Lay interlocking tiles over a suitable concrete or asphalt surface.
  • New construction: Prepare the ground, install a foundation, and finish the court surface.

A simple driveway setup is usually the easiest choice for beginners.

Building a new half court or full court requires more planning. Excavation, drainage, compaction, and concrete pouring are generally better handled by professional contractors.

You can still manage the project while hiring specialists for these stages.

Materials and Tools for a DIY Basketball Court

The materials depend on your court size and construction method.

For a basic setup, you’ll need some of the following:

  • Basketball hoop and backboard
  • Basketball, measuring tape, stakes, and string
  • Chalk and weather-resistant court-line paint
  • Broom and cleaning equipment
  • Optional modular basketball court tiles
  • Protective equipment and manufacturer’s instructions

New construction may also require gravel, compacted aggregate, concrete or asphalt, drainage materials, and hoop anchors.

Choose materials that suit your ground conditions and intended use. A surface for casual family fun may not need the same layout as one designed for competitive play.

How to Build a DIY Basketball Court Step by Step

If you already have suitable pavement, you can skip the new-foundation work in Steps 3 and 4.

If you’re starting from grass or dirt, prepare the ground and install an appropriate foundation before adding the playing surface.

For a closer look at ground preparation, drainage, surface installation, and professional contractors, see our basketball court installation guide.

Step 1: Plan Your Court Size and Layout

Decide whether you want a small shooting area, half court, or full basketball court.

If you’re still deciding on a layout, our backyard basketball court guide covers different sizes, surfaces, and design ideas.

A compact residential setup might measure around 20 × 25 feet. A full NBA court measures 94 × 50 feet, but you don’t need regulation dimensions to practice at home.

Carefully measure the available space and leave sufficient room around the perimeter for players to move safely.

Consider the basketball hoop’s overhang, nearby buildings, fences, trees, and other obstacles.

Sun orientation also matters. Positioning the court to reduce glare can make daytime games more comfortable.

For official measurements, see our basketball court dimensions guide.

Step 2: Choose a Location and Plan Drainage

Choose a location with stable ground, adequate space, and minimal obstacles.

Avoid areas with exposed rocks, large tree roots, or persistent standing water.

A basketball court needs a smooth playing surface with an appropriate drainage slope. Slightly sloping the court away from buildings may help direct rainwater toward a suitable outlet.

Follow the selected surface manufacturer’s requirements rather than assuming every court needs the same slope.

VersaCourt’s subsurface preparation guidance provides examples of foundation and drainage considerations.

Check local regulations, property boundaries, setbacks, and permit requirements before starting construction.

In the United States, contact 811 before excavation to arrange underground utility marking. Private lines may require separate locating.

Step 3: Prepare the Ground or Existing Surface

For an existing driveway, begin by sweeping away leaves, dirt, and other debris.

Inspect the concrete surface or asphalt for cracks, uneven edges, slippery coatings, and water pooling.

A damaged foundation needs attention before installing court tiles or paint. Covering serious cracks or unstable pavement won’t solve the underlying problem.

For a new court, mark the construction perimeter using stakes and string.

Clear vegetation and unsuitable soil, then prepare the subgrade according to the foundation design.

Proper compaction is crucial for reducing settlement and uneven surfaces.

Standard rigid modular tiles should not be laid directly over grass or loose ground.

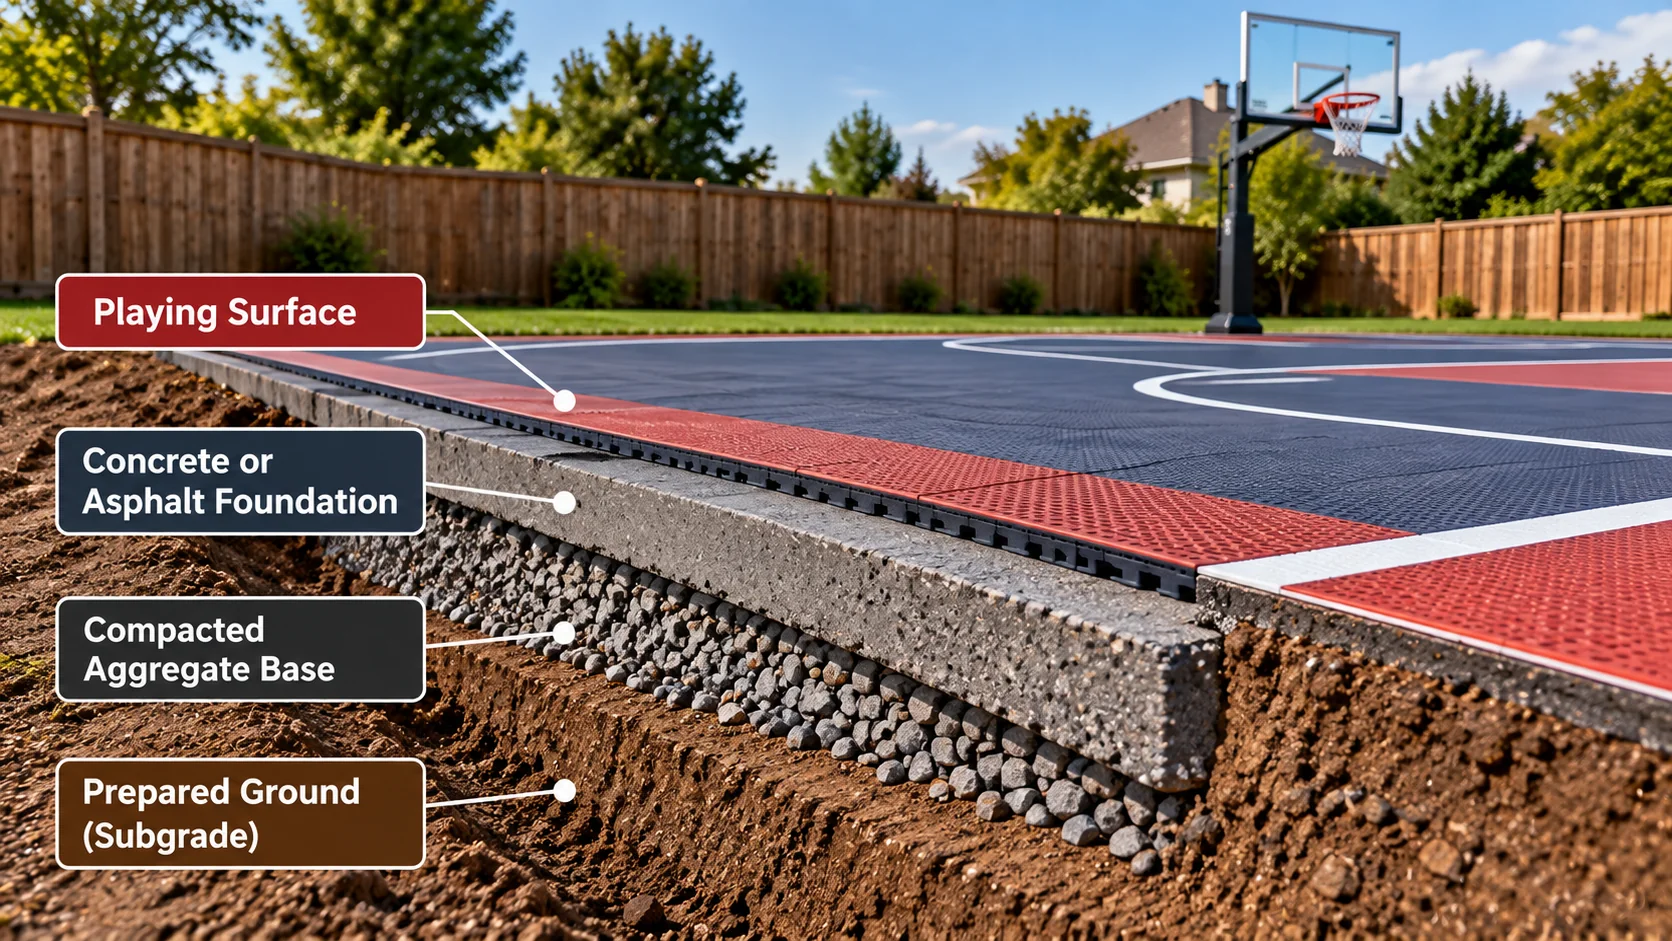
Step 4: Install the Foundation and Plan the Hoop Footing

Concrete and asphalt are common basketball court foundation materials.

Cross-section of a basketball court showing the playing surface, concrete foundation, compacted aggregate base, and prepared ground
Basketball court foundation layers, from the prepared ground to the finished playing surface.

Some manufacturers recommend a reinforced concrete slab approximately 100 mm (4 inches) thick. However, the correct thickness depends on soil conditions, climate, drainage, and expected loads.

The gravel or aggregate sub-base must also follow the foundation design. There isn’t one universal thickness suitable for every court.

Concrete pouring requires appropriate preparation, reinforcement, finishing, and curing.

For an in-ground basketball hoop, plan the pole location and anchor system before paving.

Some systems require a separate concrete footing or an expansion joint between the hoop foundation and court slab.

Don’t assume concrete is ready for hoop installation or surface coatings after two days. Follow the specified curing and installation requirements.

For detailed construction prices, see how much it costs to build a basketball court.

Step 5: Install Your Basketball Court Surface

You can choose bare pavement, modular sports tiles, or an acrylic sports coating.

Concrete or asphalt: Suitable existing pavement may be used directly if it provides adequate traction, drainage, and a reasonably smooth playing surface.

Modular basketball court tiles: These interlocking tiles snap together over an approved foundation. Some designs provide drainage openings and a more forgiving playing surface than bare pavement.

Person installing red interlocking basketball court tiles over a concrete surface
Interlocking basketball court tiles being installed over an existing concrete foundation.

Clean the base, lay out the sections, and check their alignment with the basketball hoop before connecting them.

Leave the manufacturer’s required expansion gaps. Some systems allow tiles to be trimmed around obstacles using specified tools, but follow the product instructions for cutting and edge finishing.

See VersaCourt’s residential installation guidance for a manufacturer example.

Acrylic sports coating: This creates a colored court surface using compatible preparation products, coatings, and line paint.

Application requires suitable weather, correct surface preparation, and adequate drying time.

Whichever option you choose, consider traction when wet. Some basketball surfaces can become slippery in rain, so follow the manufacturer’s wet-use and maintenance guidance.

Step 6: Assemble and Secure the Basketball Hoop

Basketball hoops can be portable, in-ground, or wall-mounted.

A portable hoop is often the simplest option for a driveway court. Fill or weight its base exactly as instructed and position it away from playing hazards.

An in-ground hoop requires a properly designed footing and secure anchors.

Follow the manufacturer’s instructions for concrete requirements, curing time, pole installation, and backboard assembly.

Goalrilla’s basketball hoop installation guide provides an example of model-specific requirements.

Wall-mounted hoops require a suitable supporting structure and approved mounting hardware. Don’t assume an ordinary wall can support one safely.

Heavy hoop assemblies may require several adults or professional installation.

Once installed, confirm the rim height and basket position. The standard regulation rim height is 10 feet, not the height of the backboard itself.

See our basketball hoop height guide for more information.

Step 7: Measure and Mark the Court Lines

Choose one basketball rule set before painting the game lines.

NBA, NCAA, FIBA, and high school courts use different measurements.

Begin with the basket position, then carefully measure the baseline, free-throw line, and any three-point markings.

Use chalk, string, and a measuring tape to mark the layout before painting.

Check that the lines are straight and that the measurements match your chosen court diagram.

Apply compatible, weather-resistant sports-court line paint according to the manufacturer’s instructions.

Some modular tile kits already include court lines, so additional painting may not be necessary.

See our basketball court diagram guide for official layouts.

Step 8: Inspect Your Finished Basketball Court

Before playing, check the hoop, court surface, and surrounding area.

Make sure all required curing and drying periods have passed.

Inspect modular tiles, perimeter edges, anchors, and ramps for loose or raised sections.

Remove debris, check for slippery areas, and confirm that rainwater drains away correctly.

Keep the court clean by sweeping leaves and dirt regularly.

Inspect cracks and surface damage promptly. Follow the manufacturer’s maintenance instructions to help protect your court for many years.

Common DIY Basketball Court Mistakes

Avoid these common problems:

  • Installing tiles on grass: Standard rigid tiles require an approved foundation.
  • Ignoring drainage: Standing water creates hazards and may damage the surface.
  • Using damaged pavement: Tiles and coatings won’t repair an unstable base.
  • Guessing concrete thickness: Follow site-specific construction requirements.
  • Installing a hoop too early: Respect the footing’s required curing period.
  • Using unsuitable paint: Choose compatible sports-surface products.
  • Mixing court measurements: Follow one consistent basketball court diagram.

Careful planning and preparation can prevent expensive repairs later.

How Long Does It Take to Build a DIY Basketball Court?

A portable hoop on suitable existing pavement can be a relatively quick project.

Modular tile installation over a prepared foundation may take several hours to a couple of days, depending on the court size and product.

Building a new concrete or asphalt court can take several weeks or longer.

Excavation, weather, curing, surface installation, and permits all affect the schedule.

Always follow the manufacturer’s instructions before moving to the next construction stage.

DIY Basketball Court FAQs

What Is the Cheapest Way to Make a Basketball Court?

Using a suitable existing driveway with a portable basketball hoop is generally the simplest low-cost option.

Temporary court markings can provide practice targets without major construction.

How Much Does It Cost to Build Your Own Basketball Court?

The cost depends on the court size, foundation, surface materials, equipment, and hired labor.

Converting existing pavement is usually less involved than constructing a new court from bare ground.

See our basketball court cost guide for detailed estimates.

What Can I Put in My Yard for a Makeshift Basketball Court?

If you have suitable pavement, you can use a portable hoop and temporary shooting markings.

For a grassy yard, avoid installing ordinary rigid sports tiles directly on the lawn. Those systems generally need a stable, approved foundation.

How Thick Should Concrete Be for a Basketball Court?

Some manufacturers recommend a reinforced concrete slab around 100 mm (4 inches) thick.

However, the correct specification depends on ground conditions, climate, drainage, and expected loads.

Have the foundation design confirmed by a qualified local contractor or engineer.

Final Thoughts

A DIY basketball court doesn’t have to involve major construction.

Starting with suitable existing pavement is usually the easiest approach. You can add a basketball hoop, court lines, or modular sports tiles to create a useful practice space.

For a new court, prioritize a stable foundation, proper drainage, and safe equipment installation before choosing the finishing details.

How Much Does It Cost to Build a Basketball Court? | 2026 Prices

How much does it cost to build a basketball court? Prices depend on the court’s size, surface, location, and whether you’re using existing pavement or building from scratch.

For a compact backyard basketball court built from bare ground, a reasonable starting budget is $10,000–$25,000+. The final price depends on the court size, surface material, site preparation, labor, and extra equipment.

Here is a comparison of basketball court construction costs in the United States for 2026.

Basketball court project Estimated cost Price scope
Driveway shooting setup $200–$2,350 Hoop and basic lines on existing pavement
Modular tiles on an existing hard surface $1,800–$5,000+ Retail tile kits; excludes hoop and base repairs
Compact backyard court (900–1,200 sq ft) $10,000–$25,000+ Planning budget for new construction
Residential half court $18,000–$32,000 Published installation-service estimate
NBA-sized half-court footprint (47 × 50 ft) $15,000–$30,000 Regional contractor estimate
Full outdoor court (94 × 50 ft) $35,000–$75,000+ Regional contractor estimate
Premium full outdoor court $85,000–$115,000 Post-tension concrete construction

These are not national averages. The driveway figure is a calculation, the compact-court figure is a planning estimate, and the larger project figures come from published service or contractor estimates. Different locations, specifications, and inclusions explain why some ranges overlap.

Sources: HomeGuide, Sport Court, USA Sports Courts, and Barton Sports Construction.

Basketball Court Construction Costs by Size

The amount of playing space you need is one of the biggest factors in your project cost.

However, a small court built on difficult ground can cost more than a larger court with easier site conditions.

If you’re deciding how much space to use at home, our backyard basketball court guide covers different court sizes, layouts, and surface options.

Driveway Basketball Setup

If you already have a driveway with suitable pavement, installing a basketball hoop and adding basic court markings may be enough.

HomeGuide lists installed hoops at $150–$2,000 and line painting at $50–$350. Combined, these add up to $200–$2,350.

This excludes driveway repairs, resurfacing, and other improvements.

For casual shooting practice, an existing driveway is usually the cheapest starting point.

Compact Backyard Basketball Court

A compact backyard court might measure 30 × 30 feet or 30 × 40 feet, providing 900–1,200 square feet.

For construction from bare ground, budget roughly $10,000–$25,000+, depending on groundwork and materials.

This is a planning estimate, not a national average. Sport Court reports that some small professionally built shooting courts have started at approximately $10,000.

Compact courts can work well for shooting, dribbling, and one-on-one basketball without requiring regulation dimensions.

Residential Half Court

A common residential half-court layout is 30 × 50 feet, or 1,500 square feet.

USA Sports Courts describes that size as a residential half-court option and separately publishes a $18,000–$32,000 estimate for half-court installation.

Its service covers projects from bare ground to a finished court, including base preparation, markings, and hoop installation. However, the published price is a general half-court estimate, not a guaranteed quote for every 30 × 50-foot build.

NBA-Sized Half Court

Half of a standard NBA playing area measures 47 × 50 feet, giving it 2,350 square feet.

Barton Sports Construction lists $15,000–$30,000 for this layout in its Mid-South service region. That estimate includes grading, a concrete base, acrylic coating, court markings, and a hoop.

Its price overlaps with the smaller residential estimate above because they come from different providers and locations.

Full Basketball Court

A standard NBA basketball court measures 94 × 50 feet, or 4,700 square feet. A typical U.S. high school court is smaller at 84 × 50 feet.

Barton estimates $35,000–$75,000+ for a standard full outdoor court and $85,000–$115,000 for a premium post-tension concrete version.

These are regional estimates. Difficult ground conditions, fencing, lighting, and other specifications can increase the final price.

See our basketball court dimensions guide for a closer look at different court sizes.

What Affects Basketball Court Construction Costs?

Two courts with the same playing dimensions can have very different budgets.

Court Size and Available Space

A larger court generally needs more paving, flooring, and line painting.

However, playing area and total construction area are not always the same.

You may need additional space behind the hoops, outside the sidelines, and around fencing or drainage systems. That extra area can increase the amount of paving required.

Our basketball court diagram shows how the main lines and markings fit within a court layout.

Site Preparation and Drainage

Building on level, accessible ground is usually easier than working on a steep or uneven backyard.

Site preparation may involve clearing vegetation, removing soil, grading, and compacting the ground.

Outdoor courts also need effective drainage to prevent standing water and premature surface damage.

HomeGuide provides a broad $1,000–$4,000 drainage allowance, although complex sites can require more extensive work.

Location and Labor

Labor rates, contractor availability, equipment access, local regulations, and soil conditions vary by location.

A contractor’s published estimate may therefore be useful for planning without reflecting the actual cost in your area.

For projects outside the United States, use these dollar amounts as a budgeting reference and obtain local quotes in your own currency.

To understand what professional installation involves before requesting quotes, read our basketball court installation guide.

Basketball Court Surface Costs

Workers applying a new surface coating to an outdoor basketball court

Your choice of surface affects construction costs, maintenance, and how the court feels during play.

But be careful: the cost of flooring is not necessarily the cost of a completed basketball court.

Court surface Estimated cost What the estimate covers
Concrete slab $6–$12 per sq ft Standard installed slab
Asphalt paving $5–$12+ per sq ft General installed paving
Acrylic resurfacing $3–$6 per sq ft Finish applied to a suitable existing base
Modular tile kits Roughly $3–$4 per sq ft Selected retail kits, before base and extras
Indoor hardwood sports floor $12–$26 per sq ft Installed hardwood sports-floor system

These figures describe different construction layers, not five complete-court alternatives.

Concrete

Concrete provides a firm foundation for outdoor basketball courts.

According to HomeGuide, a standard installed concrete slab costs approximately $6–$12 per square foot.

For a 30 × 30-foot area:

  • 900 sq ft × $6 = $5,400
  • 900 sq ft × $12 = $10,800

That gives a calculated slab budget of $5,400–$10,800.

Court coatings, hoops, markings, and substantial groundwork may cost extra. The slab must also be specified for the actual site and intended court system.

Asphalt

Asphalt is another common outdoor foundation.

General asphalt paving prices are approximately $5–$12+ per square foot installed, based on HomeGuide’s asphalt driveway pricing.

A basketball court may need additional groundwork, sports coating, and markings.

Asphalt can be cheaper initially in some projects, but installed asphalt and concrete prices overlap. Compare complete construction quotes rather than assuming one will always cost less.

Acrylic Coatings

Acrylic sports coatings add color, traction, and a finished appearance to properly prepared concrete or asphalt.

Resurfacing an existing court may cost approximately $3–$6 per square foot, depending on its condition and the coating system.

Acrylic is a finish, not a replacement for a stable foundation. Structural cracking or poor drainage can require separate repairs.

Modular Basketball Court Tiles

Interlocking sports tiles provide a finished playing surface and can be installed over a suitable existing hard base.

Examples from ModuTile include:

Basketball tile kit Listed retail price
20 × 24 ft $1,843
30 × 30 ft Approximately $2,931
50 × 30 ft $4,784

Retail prices checked in October 2026. Kit options, shipping, taxes, base preparation, and basketball equipment may change the amount paid.

The cited 20 × 24-foot and 50 × 30-foot kits include painted lines, although edging and other options vary by product.

These are flooring-kit prices, not completed-court prices.

ModuTile also advises against installing its rigid outdoor tiles directly over grass or other soft ground.

Indoor Hardwood

Hardwood sports flooring is a popular choice for serious indoor basketball.

Junckers estimates $12–$26 per square foot installed for a specialist hardwood system.

That includes the subfloor, hardwood surface, markings, finishing, and installation labor.

It does not include constructing the building.

Other indoor materials, including suitable rubber or synthetic sports flooring, may have different prices and playing characteristics.

Basketball Court Cost Breakdown

A complete construction quote should account for more than the court surface.

Expense What to check
Site preparation Clearing, excavation, grading, and soil removal
Foundation Concrete or asphalt, reinforcement, and compacted base
Drainage Surface slope, drains, and water discharge
Playing surface Coatings, tiles, or another sports-floor system
Basketball equipment Hoop, backboard, footing, padding, and installation
Court markings Boundary lines, key, free-throw line, and three-point line
Optional features Fencing, lighting, landscaping, and seating

Additional expenses Permits, delivery, inspections, taxes, and cleanup

Basketball Hoops and Equipment

HomeGuide lists basketball hoops at approximately $150–$2,000 installed, depending on the type.

Permanent in-ground systems may require a separate concrete footing and professional installation.

Adjustable hoops, stronger backboards, and protective padding can increase costs.

Our basketball hoop height guide explains regulation height and adjustments for younger players.

Fencing and Lighting

Fencing can help prevent basketballs from leaving the playing area, while lighting makes evening practice possible.

Costs depend on the number of lights, electrical work, fence height, and total perimeter.

Rather than relying on one generic figure, ask contractors for separately priced options.

Permits and Extra Costs

Local planning or building rules may apply to permanent paving, grading, fencing, lighting, and electrical work.

Before agreeing to a price, check whether permits, delivery, drainage, site cleanup, and landscaping are included.

Do not add the cost of a new slab to a turnkey quote that already includes the foundation. Doing so would count the same expense twice.

Indoor vs. Outdoor Basketball Court Costs

Building a new indoor basketball facility is generally more expensive than constructing a comparable outdoor court because it also requires an enclosed structure.

However, using an existing building changes the calculation.

Outdoor Basketball Courts

Outdoor construction usually includes ground preparation, a foundation, the playing surface, markings, and basketball equipment.

For a full outdoor court, Barton’s regional estimate is $35,000–$75,000+ for standard construction.

Ongoing expenses can include cleaning, crack repairs, and resurfacing.

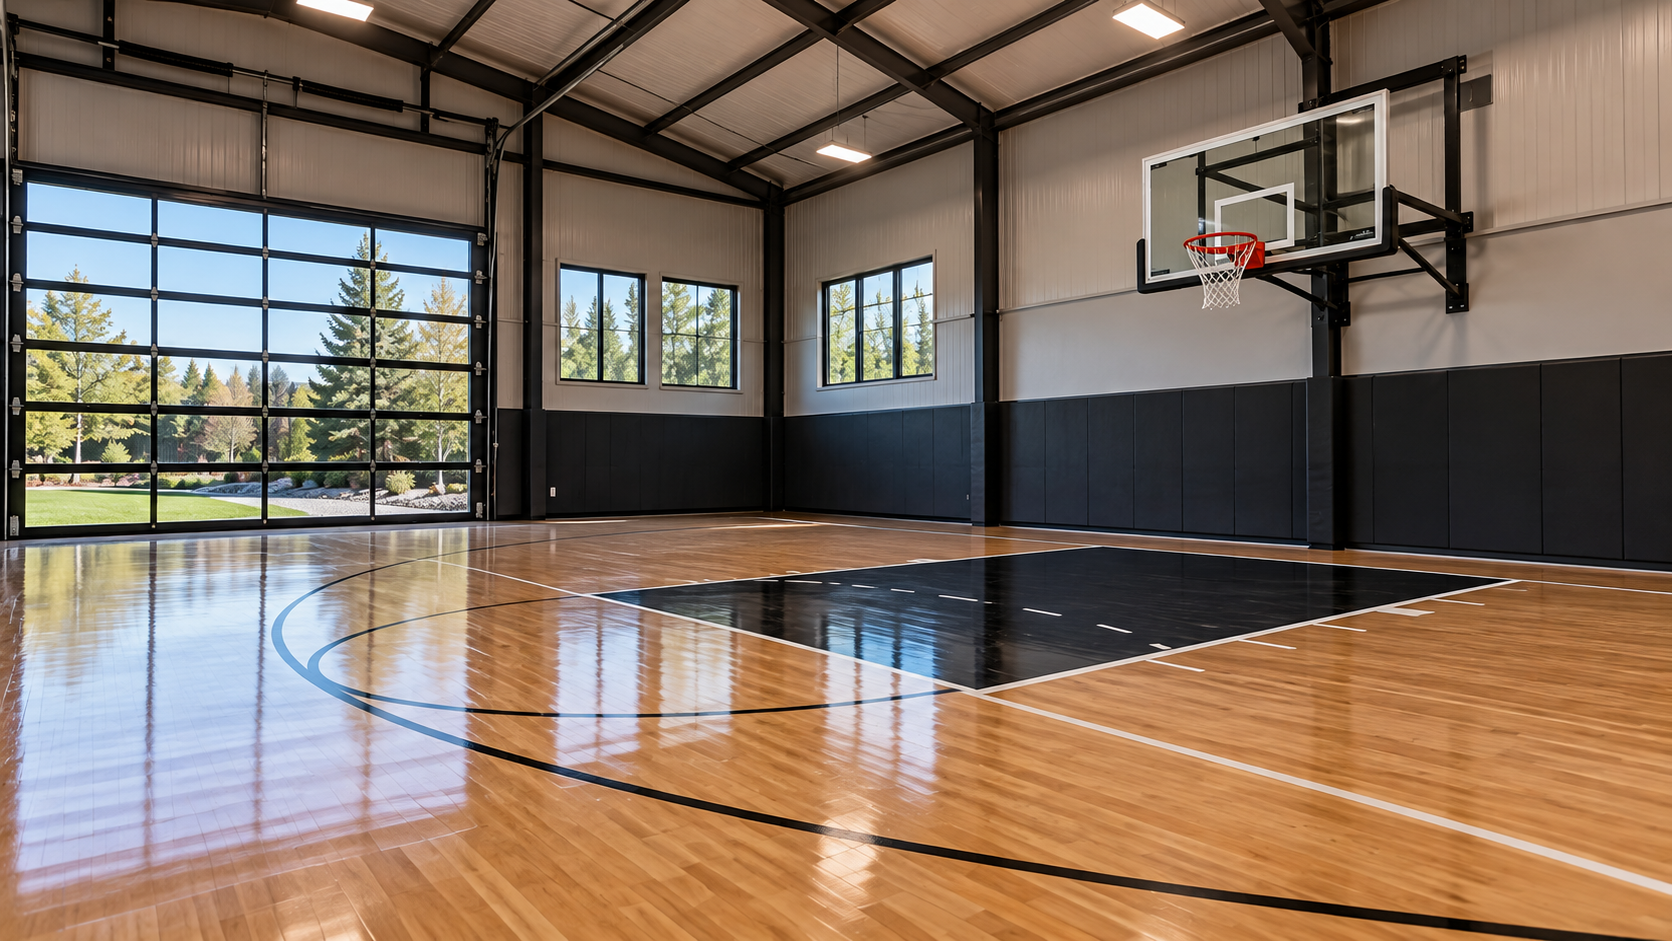
Indoor Basketball Courts

Indoor basketball court with hardwood flooring and a wall-mounted hoop

If you already have a suitable garage or barn, HomeGuide estimates $4–$16 per square foot for a basic conversion involving flooring, hoops, and lines.

For a specialist hardwood floor, Junckers gives $10,000–$45,000 for small residential or training half courts in existing buildings.

Neither figure necessarily covers structural changes, ventilation, lighting upgrades, or other building improvements.

Building an entirely new enclosed space is more expensive. HomeGuide provides a broad $90–$210 per square foot planning range for a new residential addition.

That is a building-cost benchmark, not a basketball-flooring price. A complete indoor facility may need considerably more space than the marked court for safe clearances and access.

DIY vs. Professional Basketball Court Installation

Doing some work yourself can reduce labor costs, especially when you already have a suitable playing surface.

For example, installing compatible modular tiles or painting simple markings may be realistic DIY projects.

For a step-by-step walkthrough, see our DIY basketball court guide to learn how to prepare the ground, choose a surface, and install a hoop.

However, excavation, ground leveling, drainage, concrete construction, permanent hoop footings, and electrical installation involve greater risks.

Poor foundation work can cause cracking, uneven playing conditions, or expensive reconstruction.

For a new court, compare professional installation with the full cost of managing separate trades yourself. Include materials, equipment rental, delivery, waste removal, and possible repairs.

DIY savings are most believable when the existing foundation is already in good condition.

How Much Does Basketball Court Maintenance Cost?

Basketball courts need regular upkeep, although costs vary by material and condition.

Routine maintenance includes removing debris, keeping drains clear, checking hoop hardware, and watching for cracks or standing water.

Outdoor acrylic courts may require resurfacing approximately every 4–8 years, according to Barton Sports Construction.

Barton also publishes a $4,000–$9,000 full-court resurfacing estimate for its region, covering crack treatment, fresh acrylic coating, and markings.

This is not an annual maintenance charge. Serious foundation damage may require more expensive repairs.

Modular tiles generally need cleaning and occasional replacement of damaged sections, while indoor hardwood requires suitable cleaning and environmental conditions.

Budget for both everyday upkeep and larger repairs over time.

How to Build a Basketball Court for Less

You can reduce project costs without compromising important construction work.

  1. Use an existing driveway or slab. Avoiding a new foundation can produce substantial savings if the surface is sound.
  2. Choose a court size that matches your needs. A compact shooting area may be enough for individual practice.
  3. Keep the design simple. Custom graphics, elaborate fencing, and premium lighting increase costs.
  4. Compare itemized quotes. Make sure each contractor includes the same foundation, surface, equipment, and groundwork.
  5. Consider modular tiles over suitable pavement. A flooring upgrade may be cheaper than constructing a court from bare ground.
  6. Add optional features later. Fencing, lighting, and other accessories do not always need to be installed immediately.

Never reduce essential spending on drainage, ground stability, safe playing space, or secure hoop installation just to achieve a lower headline price.

Basketball Court Cost FAQs

What Is the Cheapest Way to Build a Basketball Court?

Using an existing suitable driveway with a hoop and basic markings is generally the cheapest practical approach.

Combining HomeGuide’s installed hoop and line-painting ranges gives approximately $200–$2,350, before any pavement repairs.

How Much Land Do You Need for a Basketball Court?

A 30 × 30-foot compact court needs 900 square feet of playing area. A 30 × 50-foot residential half court needs 1,500 square feet.

A full NBA court measures 94 × 50 feet, or 4,700 square feet.

The total site should be larger where necessary to provide safe clearance, drainage, and access.

Does a Basketball Court Add Value to a Home?

A basketball court may appeal to some buyers, but it does not guarantee a higher property value.

Local demand, installation quality, maintenance, and the amount of yard space used all influence whether buyers see it as an advantage.

Build a court primarily for the enjoyment and use you expect from it.

Do You Need a Permit for a Backyard Basketball Court?

Possibly. Requirements vary by location and can depend on paving, drainage, fencing, lighting, and changes in ground level.

Check local rules and any homeowners association restrictions before construction.

How Long Does It Take to Build a Basketball Court?

A complete outdoor project may take several weeks because of site preparation, permitting, foundation work, curing, and weather delays.

Installing tiles over an existing prepared surface can be much quicker.

Is Concrete or Asphalt Cheaper for a Basketball Court?

Asphalt can have a lower initial cost, but typical installed price ranges overlap with concrete.

Compare quotes using the same dimensions, site preparation, foundation specifications, finishes, and equipment. The cheapest material price does not always produce the cheapest completed court.

Final Thoughts

The cost of building a basketball court depends on its size, location, foundation, and playing surface.

A simple driveway setup can cost a few hundred dollars, while a compact backyard court built from bare ground may require a five-figure budget. A full outdoor court can cost tens of thousands of dollars or more.

Before starting, decide how much playing space you actually need and whether you can reuse an existing suitable surface.

Then request detailed local quotes that clearly separate construction work, materials, basketball equipment, and optional extras. That will give you a more reliable budget than a single average price.

Basketball Court Diagram | Lines, Markings & Layout Explained

A basketball court diagram shows the baskets, boundary lines, and marked playing areas. It helps beginners understand the court, coaches explain positioning, and players recognize where different rules apply.

Below, you’ll find full-court and half-court layouts, explanations of the main markings, and a comparison of NBA, NCAA, FIBA, and high school courts.

Full-Court Basketball Diagram

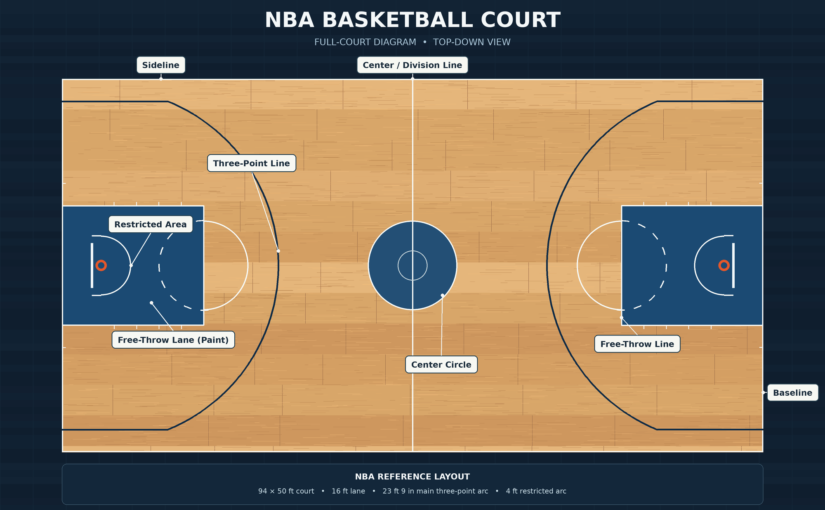
A full-court basketball diagram shows the entire playing surface, including both baskets, sidelines, baselines, center line, center circle, three-point lines, and free-throw lanes.

The center line divides the court into two halves. Each end contains a basket, a free-throw area, and a three-point arc. The basket’s height is another important measurement, which we explain in our basketball hoop height guide.

Official diagrams may also show measurements, lane-space marks, bench areas, and the scorer’s table. These extra details are useful when comparing league rules or planning court markings.

Half-Court Basketball Diagram

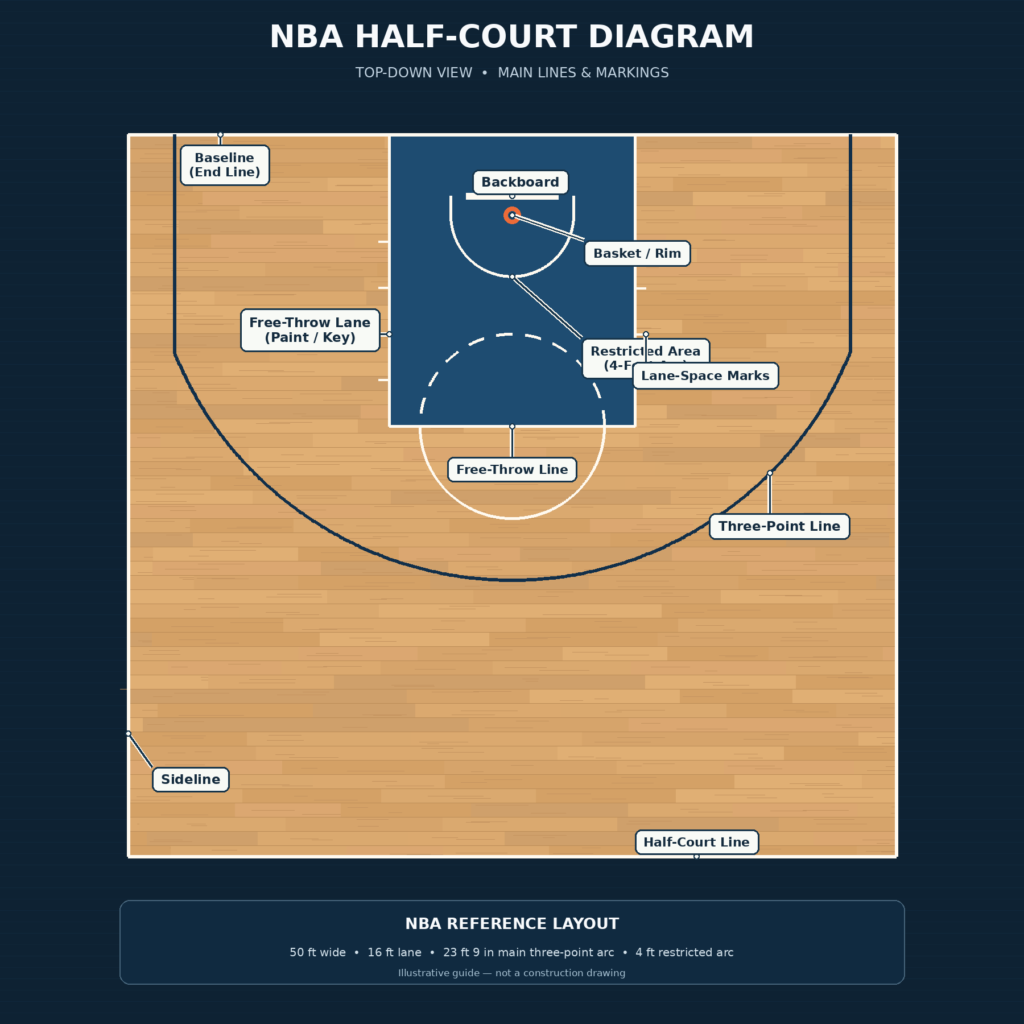
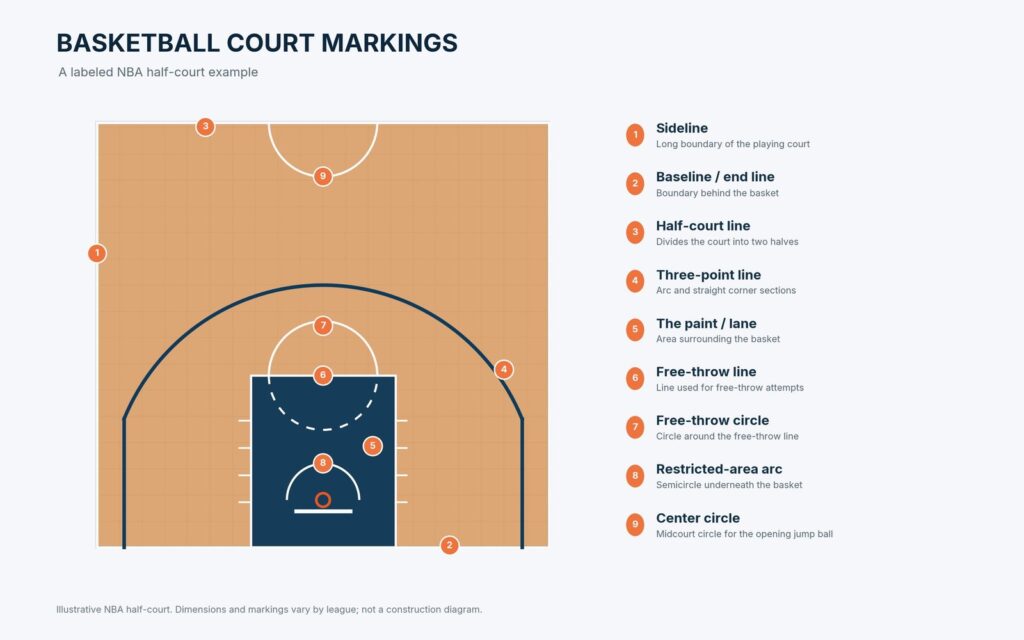
Labeled NBA half-court basketball diagram showing the three-point line, free-throw lane, restricted area, and basket
NBA half-court diagram showing the main lines and markings around the basket.

A half-court diagram gives you a closer look at one basket and the surrounding playing area.

If you’re planning a smaller court at home, our backyard basketball court guide covers practical layouts, sizes, and surface options.

Starting near the hoop and moving outward, you can identify the small restricted-area or no-charge arc, the painted free-throw lane, the free-throw line, and the three-point line.

Coaches also use blank half-court diagrams to draw basketball plays, explain player movement, and plan drills.

A half-court diagram is usually a simplified view of one end of a full court, rather than a separate set of official rules.

Basketball Court Lines and Markings Explained

If you’re marking out a court at home, our DIY basketball court guide explains how to prepare the surface, install a hoop, and add the playing lines.

Sidelines and Baselines

The sidelines are the long boundary lines along each side of the court. The shorter boundaries behind the baskets are called end lines or baselines.

A player touching one of these boundary lines is out of bounds. The lines help officials determine whether the ball or a player has left the playing area.

Center Line and Center Circle

The center line, also called the division line, separates the court into two halves.

The center circle marks the location of the opening jump ball. On NBA and NCAA courts, it has a 6-foot radius and a 12-foot diameter.

The division line also helps distinguish a team’s frontcourt from its backcourt.

Three-Point Line

The three-point line separates the areas used to determine whether a successful field goal counts for two or three points.

On NBA courts, the main arc measures 23 feet 9 inches from the center of the basket. Corner three-pointers are shorter because the line runs parallel to the sidelines.

The shooter’s feet must be outside the three-point line when the shot is released for a successful basket to count as three points. A foot touching the line makes it a two-point attempt.

Free-Throw Line and Lane

The free-throw line marks where a player stands to attempt free throws.

On NBA courts, it’s 15 feet from the plane of the front face of the backboard.

The rectangular area extending toward the baseline is commonly called the paint, key, or free-throw lane.

Small lane-space marks identify where players line up during free throws. The free-throw circle, centered on the free-throw line, is another feature shown on official diagrams.

Restricted Area and No-Charge Arc

The small arc beneath the basket is important in certain charging and blocking decisions. To understand the equipment above this area, see our guide to the parts of a basketball hoop.

In the NBA, it’s called the restricted area and has a 4-foot radius measured from the center of the basket ring.

FIBA uses the term no-charge semicircle for its smaller 1.30-meter arc.

However, FIBA calls the larger rectangular paint the restricted area. This is why the same term can point to different markings on NBA and FIBA diagrams.

NBA, NCAA, FIBA, and High School Court Diagrams

Basketball courts share a similar layout, but their measurements and markings vary between leagues.

League Court size Three-point distance Lane width
NBA 94 × 50 ft 23 ft 9 in (main arc) 16 ft
NCAA 94 × 50 ft 22 ft 1¾ in 12 ft
FIBA 28 × 15 m 6.75 m 4.90 m
NFHS high school Typically 84 × 50 ft 19 ft 9 in 12 ft

These are useful reference measurements, not complete construction specifications.

One important NCAA difference concerns the restricted-area arc. The men’s court includes a marked 4-foot arc, while NCAA women’s rules no longer require that painted marking.

FIBA diagrams use metric measurements, while NBA, NCAA, and NFHS diagrams generally use feet and inches.

For a more detailed comparison, read our basketball court dimensions guide.

Planning to build your own court? Read our guide on how much it costs to build a basketball court to compare construction prices and materials.

How to Read a Basketball Court Diagram

Start by checking which rules the diagram follows. An NBA layout shouldn’t automatically be used as a guide for marking an NCAA or FIBA court.

Then identify the main features:

  1. Find the sidelines and baselines to establish the court boundaries.
  2. Locate the center line and center circle to understand the full-court layout.
  3. Find the basket and free-throw lane at each end.
  4. Follow the three-point line around the basket to identify the shooting area.
  5. Check the smaller markings, including restricted arcs and free-throw rebound spaces.

Pay attention to measurement arrows. Official diagrams may measure to the inside or outside edge of a painted line. That difference matters because court markings have width.

A recreational driveway or backyard court may use fewer markings or a smaller playing area. Don’t assume every diagram shows a regulation court.

Printable Basketball Court Diagrams

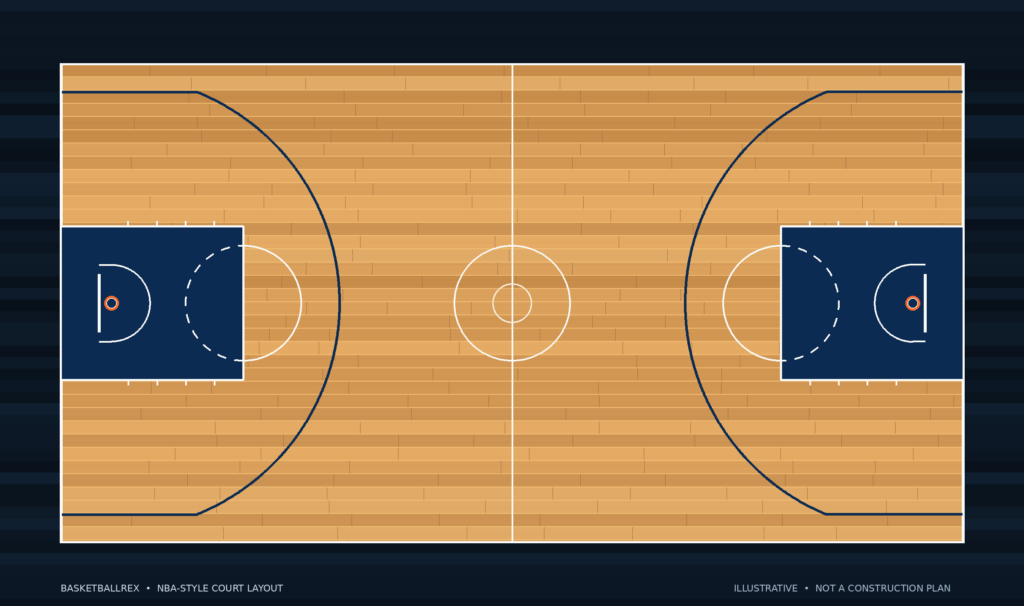
Blank full-court basketball diagram showing both baskets, three-point lines, free-throw lanes, and center circle
Unlabeled basketball court diagram showing the full playing area and main court markings.

You can find official basketball court diagrams through the organizations responsible for each set of rules.

For coaching, blank full-court and half-court templates are also useful for drawing plays, planning drills, and explaining player positions.

Basketball Court Diagram FAQs

What’s the difference between a full-court and half-court diagram?

A full-court diagram shows both baskets and the entire playing surface. A half-court diagram focuses on one end, making individual markings easier to see.

What is the key on a basketball court?

The key is a common name for the painted free-throw lane near the basket. Its width and official terminology depend on the league.

Why do some basketball courts have multiple three-point lines?

Some gyms are used for different competitions, so they may have separate three-point markings for high school, college, or international basketball.

Are all basketball court diagrams the same?

No. NBA, NCAA, FIBA, and high school courts share basic features, but their measurements and some markings differ.

Basketball Court Dimensions | NBA, FIBA, NCAA & More

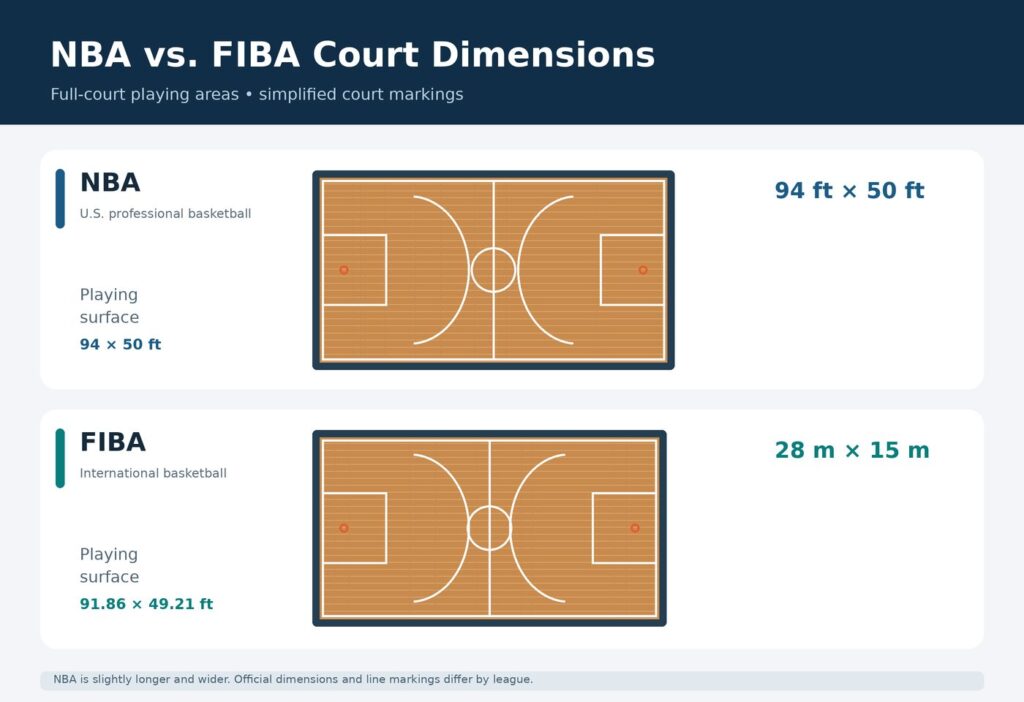
An NBA basketball court measures 94 feet long and 50 feet wide. A FIBA court measures 28 meters by 15 meters (approximately 91 feet 10 inches by 49 feet 3 inches), while the ideal U.S. high school court measures 84 by 50 feet.

However, basketball court dimensions aren’t identical across every league. Three-point lines, free-throw lanes, and restricted-area markings also vary.

This guide compares the official measurements, explains the different court markings, and shows what to consider when planning a smaller home basketball court.

League Court length × width Main three-point distance Lane width
NBA 94 × 50 ft 23 ft 9 in 16 ft
WNBA 94 × 50 ft 22 ft 1¾ in 16 ft
FIBA 28 × 15 m 6.75 m 4.90 m
NCAA men 94 × 50 ft* 22 ft 1¾ in 12 ft
NCAA women 94 × 50 ft* 22 ft 1¾ in 12 ft
NFHS high school 84 × 50 ft ideal; up to 94 ft long 19 ft 9 in 12 ft

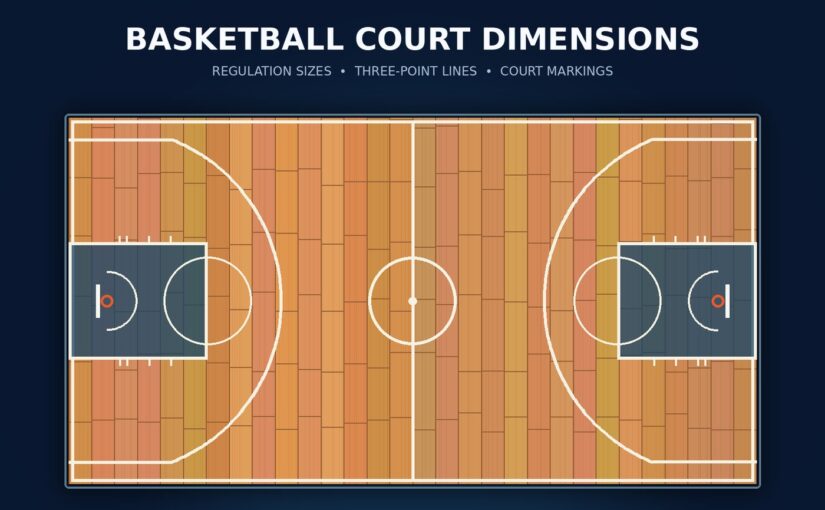
Comparison of NBA 94-by-50-foot and FIBA 28-by-15-meter basketball courts

Want to see where these measurements appear on the court? Our basketball court diagram guide shows the main lines, markings, and full-court and half-court layouts.

The NCAA court diagram describes 50 feet as the optimum width.

The three-point measurements refer to the main arcs. Some leagues have shorter corner distances.

All these standards use a basket height of approximately 10 feet (3.05 meters).

The biggest differences are court length, three-point distance, lane width, and restricted-area markings.

NBA Basketball Court Dimensions

These measurements follow the NBA’s official court and equipment rules.

The National Basketball Association uses a playing court measuring 94 feet long and 50 feet wide.

That gives the court an area of 4,700 square feet, excluding space outside its boundaries.

The court has two baskets, a center line, a center circle, and marked shooting and free-throw areas at each end.

NBA Three-Point Line

The NBA three-point arc measures 23 feet 9 inches from the center of the basket.

However, the corner three-point distance is shorter.

The straight sections of the three-point line sit 3 feet inside the sidelines, making the corner distance approximately 22 feet.

This means an NBA three-point shot isn’t always taken from the same distance.

NBA Free-Throw Lane and Restricted Area

The NBA free-throw lane measures 16 feet wide.

The free-throw line sits 15 feet from the plane of the front face of the backboard.

A restricted-area semicircle with a 4-foot radius is marked underneath the basket.

This marking helps officials apply certain charging and blocking rules.

WNBA Basketball Court Dimensions

The Women’s National Basketball Association uses the same overall court size as the NBA.

Its main measurements include:

  • Court length: 94 feet
  • Court width: 50 feet
  • Lane width: 16 feet
  • Rim height: 10 feet
  • Restricted-area radius: 4 feet

The main difference is the three-point line.

WNBA Three-Point Line

The WNBA three-point arc measures 22 feet 1¾ inches from the center of the basket.

That’s shorter than the NBA’s 23-foot-9-inch main arc.

Like the NBA, the WNBA uses straight corner sections positioned 3 feet inside the sidelines.

Therefore, NBA and WNBA basketball courts share the same playing surface dimensions but have different three-point markings.

FIBA Basketball Court Dimensions

FIBA, the International Basketball Federation, uses metric measurements.

These measurements follow FIBA’s official basketball rules.

A regulation FIBA court measures:

  • Length: 28 meters (approximately 91 feet 10 inches)
  • Width: 15 meters (approximately 49 feet 3 inches)
  • Rim height: 3.05 meters
  • Center-circle radius: 1.80 meters

A FIBA court is slightly shorter and narrower than an NBA court.

Its dimensions are measured from the inner edges of the boundary lines.

FIBA Three-Point Line

The FIBA three-point arc measures 6.75 meters, approximately 22 feet 1¾ inches.

This distance runs from the point directly below the basket’s center to the outside edge of the three-point line.

The straight corner sections have their outside edges positioned 0.90 meters from the inside edges of the sidelines.

FIBA Free-Throw Lane and No-Charge Area

The FIBA lane measures 4.90 meters wide.

The free-throw line is 3.60 meters long, with its farther edge positioned 5.80 meters from the inner edge of the end line.

FIBA officially calls the rectangular lane the restricted area.

It calls the semicircle underneath the basket the no-charge semicircle area, which has a radius of 1.30 meters.

This terminology matters because the NBA generally uses Restricted Area to describe the semicircle beneath the basket, rather than the entire rectangular lane.

NCAA Basketball Court Dimensions

NCAA college basketball uses a 94-foot court length, with 50 feet shown as the optimum width in its official court diagram.

The NCAA provides an official basketball court diagram showing the dimensions and markings used in college basketball.

Both men’s and women’s basketball use these main measurements:

  • Court length: 94 feet
  • Optimum court width: 50 feet
  • Three-point arc: 22 feet 1¾ inches
  • Corner three-point distance: 21 feet 7⅞ inches
  • Free-throw lane width: 12 feet
  • Center-circle radius: 6 feet
  • Rim height: 10 feet

The 12-foot lane is narrower than the NBA’s 16-foot lane.

NCAA Men’s vs. Women’s Court Markings

Most major NCAA court dimensions are shared between men’s and women’s basketball.

However, their restricted-area rules differ.

NCAA men’s basketball uses a marked restricted-area arc with a 4-foot radius.

NCAA women’s basketball uses a restricted area directly underneath the basket, without requiring the same painted 4-foot arc.

This distinction is important when comparing NCAA basketball court markings.

High School Basketball Court Dimensions

The National Federation of State High School Associations (NFHS) provides the primary rules framework for U.S. high school basketball.

The NFHS provides an official high school basketball court diagram showing court dimensions and markings.

The ideal high school basketball court measures 84 feet long and 50 feet wide.

However, high school courts can be longer, with lengths up to 94 feet permitted.

This means not every high school basketball court has exactly the same dimensions.

High School Three-Point Line and Lane

The standard NFHS three-point arc measures 19 feet 9 inches.

That’s shorter than the main three-point lines used by the NBA, WNBA, NCAA, and FIBA.

Other measurements include:

  • Lane width: 12 feet
  • Free-throw line: 15 feet from the backboard face
  • Center-circle radius: 6 feet
  • Rim height: 10 feet

The standard NFHS court diagram doesn’t include an NBA-style painted restricted-area semicircle beneath the basket.

Schools planning construction or court repainting should consult the current NFHS court diagram and their state association’s requirements.

Basketball Court Lines and Markings Explained

The lines on a basketball court define boundaries, shooting distances, and areas used during play.

Labeled NBA half-court diagram identifying the three-point line, free-throw line, paint, restricted area, and court boundaries
NBA half-court example. Markings vary by league.

Sidelines, Baselines, and Half-Court Line

Sidelines run along the two longer sides of the court.

Baselines, also called end lines, run behind the baskets.

These lines mark the outer boundaries of the playing area.

The half-court line, or center line, divides the court into two halves.

It also helps determine frontcourt and backcourt violations.

Three-Point Line

The three-point line separates the two-point and three-point shooting areas.

A successful field-goal attempt counts for three points when the shooter releases the ball from the three-point area, without touching the line.

The distance depends on the league.

For example, the NBA’s main three-point arc is 23 feet 9 inches, compared with the NFHS high school distance of 19 feet 9 inches.

Free-Throw Line and Circle

The free-throw line identifies where players attempt free throws.

NBA, WNBA, and NCAA rules position the line 15 feet from the front face of the backboard.

FIBA measures its free-throw line from the end line instead.

The free-throw circle and semicircle markings surround the free-throw area. Their official dimensions depend on the competition rules.

The Key or Paint

The key, paint, and free-throw lane are common names for the rectangular area extending from the baseline toward the free-throw line.

The lane is:

  • 16 feet wide in NBA and WNBA basketball
  • 4.90 meters wide in FIBA basketball
  • 12 feet wide in NCAA basketball
  • 12 feet wide in NFHS high school basketball

This area is used when applying free-throw positioning rules, lane violations, and other playing restrictions.

Center Circle and Jump Ball

The center circle is positioned at midcourt.

It’s used during the opening jump ball and forms part of the court’s central markings.

The NBA and NCAA use a 6-foot center-circle radius.

FIBA uses a 1.80-meter radius.

Restricted Area and Charge Arc

Some basketball courts have a semicircle underneath the basket that affects charging and blocking decisions.

Examples include:

  • NBA and WNBA: 4-foot restricted-area radius
  • FIBA: 1.30-meter no-charge semicircle
  • NCAA men: Painted 4-foot restricted-area arc
  • NCAA women: Restricted area beneath the basket without the same painted arc

The names, markings, and associated rules aren’t identical across leagues.

Hash Marks and Lane Markings

Smaller court markings include hash marks and lane-space markings.

Lane markings identify where players stand during free throws.

Other marks may help define administrative areas or positions used during certain game situations.

Their exact locations depend on the applicable court diagram.

How Are Basketball Court Measurements Taken?

Official basketball court dimensions depend on specific measuring points.

Using the wrong edge of a painted line can produce an inaccurate layout.

Court Length and Width

Court length and width are measured according to the governing body’s boundary-line rules.

FIBA, for example, specifies a 28-by-15-meter playing court measured from the inner edges of its boundary lines.

Three-Point Distance

Three-point distance is measured from the basket’s center projected onto the floor.

It isn’t measured from the front of the rim.

The applicable rulebook also specifies which edge of the painted three-point line is used.

For example, FIBA and NCAA measurements identify the outside edge of the arc.

Free-Throw Distance

In NBA, WNBA, and NCAA basketball, the familiar 15-foot free-throw measurement refers to the plane of the front face of the backboard.

It doesn’t mean 15 feet from the baseline.

FIBA instead specifies that the farther edge of its free-throw line must be 5.80 meters from the inner edge of the end line.

Basket Position and Height

NBA and NCAA court diagrams place the basket center approximately 5 feet 3 inches from the end line.

FIBA specifies 1.575 meters.

The standard rim height is measured from the playing surface to the top edge of the rim.

For more detail, see our basketball hoop height guide.

Half-Court and Backyard Basketball Court Dimensions

You don’t need a full regulation basketball court to practice shooting or play recreational games.

Smaller layouts can work well, depending on available space.

For practical home court sizes, layouts, and surface options, see our backyard basketball court guide.

If you’re planning to build your own playing area, our DIY basketball court guide explains how to prepare the ground, choose a suitable surface, and install a hoop.

How Big Is a Basketball Half Court?

Half the length of an NBA court is 47 feet.

Keeping the full 50-foot width gives a playing area measuring 47 × 50 feet.

Half the length of a FIBA court is 14 meters, giving a 14-by-15-meter playing area.

These figures are useful references when dividing regulation floors in half.

However, specific half-court competitions can have their own requirements.

Backyard Basketball Court Sizes

There’s no universal regulation size for a backyard basketball court.

A home court can be designed around the activities you want to practice.

Possible priorities include:

  • Shooting from different positions
  • Practicing free throws
  • Working on layups
  • Playing one-on-one basketball
  • Including part of a three-point arc

A driveway shooting area can be much smaller than a recreational half court.

The important consideration is whether you have enough usable space for your intended activities and safe movement.

If you’re choosing equipment for your home court, our guide to the parts of a basketball hoop explains the rim, backboard, pole, and base.

Is 30 × 30 Feet Enough for Basketball?

A 30-by-30-foot area can accommodate a compact recreational shooting setup, depending on hoop placement and surrounding space.

It may provide room for shooting drills, close-range practice, and some limited movement.

However, it won’t accommodate a regulation half court.

If you’re planning a home basketball court, consider where the basket will stand and how much room players need around it.

Basketball Court Space and Clearance

The playing court and the total space required for a basketball facility aren’t always the same.

Once you’ve worked out how much space your court needs, see our basketball court installation guide for the construction process, surface preparation, and hiring an installer.

Space Around the Boundaries

Players need room outside the sidelines and baselines.

For official FIBA basketball, the playing court measures 28 × 15 meters, but the surrounding floor must include an unobstructed boundary lane at least 2 meters wide.

This makes the minimum overall FIBA court-and-surroundings footprint 32 × 19 meters.

Other organizations have their own requirements.

For recreational courts, avoid placing hard obstacles where players are likely to run or land.

Indoor Ceiling Height

Indoor basketball courts also need enough overhead space for shooting and other play.

A low ceiling can interfere with high-arcing shots.

However, one ceiling-height measurement shouldn’t be treated as suitable for every professional arena, school gym, and home basketball area.

If you’re designing a regulation facility, check the relevant competition and building requirements.

For a home setup, consider the actual ceiling height, the type of hoop, and the activities you intend to practice.

Frequently Asked Questions

Are NBA and College Basketball Courts the Same Size?

Both use a 94-foot court length, with 50 feet serving as the standard NBA width and optimum NCAA width.

However, their markings differ.

The NBA has a 16-foot lane and a 23-foot-9-inch main three-point arc. NCAA courts use a 12-foot lane and 22-foot-1¾-inch arc.

Is a WNBA Court Smaller Than an NBA Court?

No. Both use a 94-by-50-foot playing surface.

The WNBA has a shorter main three-point line.

Is a FIBA Court Smaller Than an NBA Court?

Yes. A FIBA court measures 28 × 15 meters, compared with the NBA’s 94 × 50 feet.

How Long Is a High School Basketball Court?

The NFHS ideal length is 84 feet, although courts up to 94 feet long are permitted.

How Far Is the Three-Point Line?

The main three-point distance is 23 feet 9 inches in the NBA, 22 feet 1¾ inches in the WNBA and NCAA, 6.75 meters in FIBA, and 19 feet 9 inches in NFHS high school basketball.

Corner distances can differ.

How Far Is the Free-Throw Line From the Basket?

In NBA, WNBA, and NCAA basketball, the free-throw line is positioned 15 feet from the front face of the backboard.

FIBA uses a different reference point measured from the end line.

Does a Home Basketball Court Need Regulation Dimensions?

No. Home basketball courts can be smaller than regulation courts.

Choose dimensions based on your space, playing needs, and safe clearance around the hoop.

Final Answer

Basketball court dimensions vary by league.

NBA and WNBA courts measure 94 × 50 feet. FIBA courts measure 28 × 15 meters. NCAA courts use a 94-foot length with an optimum width of 50 feet, while the ideal NFHS high school layout measures 84 × 50 feet.

The three-point line, lane width, and restricted-area markings also differ.

For competition use, refer to the current official court diagram. For recreational basketball, choose a court layout that suits your available space and intended activities.